Part 2: Use Pre-Built Applications To Increase Your Productivity
In this second post, we create project templates to give your coding a jumpstart.

As a web architect in a company, you, whether it's just you or a team of architects, are responsible for setting the standards for small, medium, and large enterprise applications when new projects appear out of nowhere.
Wouldn't it be great to have a standard project template to automatically open with the company readme, company design patterns, T4 templates, and sample interfaces ready for developers to immediately start coding?
Once you've created a couple projects and have your own application patterns for your team, creating a standard project template is one of the best and easiest ways to distribute application standards across the company.
Now, let me take my corporate hat off. The real benefit is if you are a freelance developer. Create a number of web sites for clients and then take the best from all of the projects and, over time, continually combine them into one project. Eventually, you will have a project template that is the ultimate website that will accomplish close to 80% of your clients needs.
What I'm talking about is the Visual Studio Project and Item Templates.
Where are they?
You use them everyday! When you click File, New Project, these are your Project Templates.

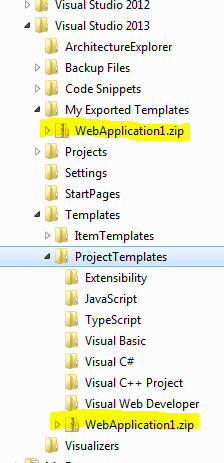
When you create your own project templates, they are placed in the following directory:
C:\Users\<username>\Documents\Visual Studio <version>\Templates\ProjectTemplates
You won't have anything in those directories at all, but you will in a little bit. :-)
Let's start building a sample project template.
Creating a Project Template
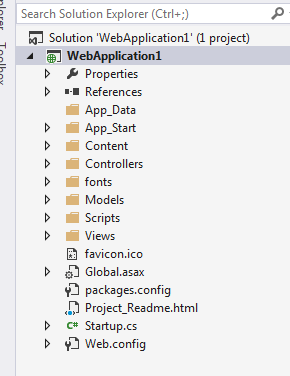
Let's create a brand new ASP.NET MVC project.

This is our template that we'll build from scratch. At this point, create the project exactly you way you want it.
Add whatever you want...standard controller classes, action filters you want to use, whatever you see fit to speed your development.
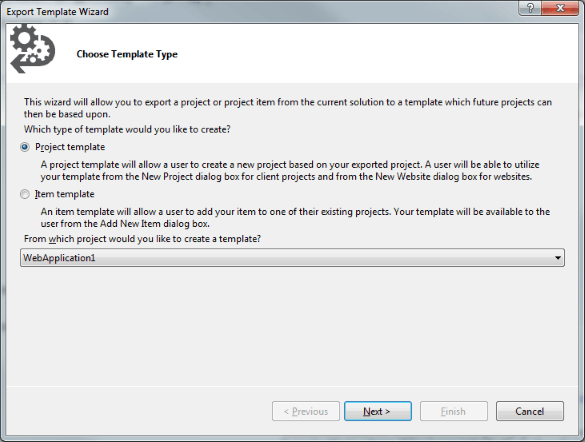
Once you have everything the way you want it, make sure your project is selected in your Solution Explorer. Then go to File/Export Template. A wizard will appear and you want to select Project.

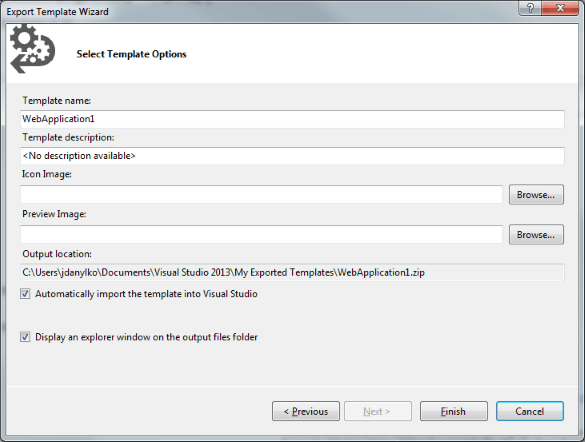
Click Next and fill out your template information.

When you click Finish, your exported project template will be in the following directories.

Once you have the zip file, unzip the project into a directory so we can edit it further.
Editing the project
Once the project is unzipped to a directory, you can edit the project and add your template parameters to ANY file in this project, including the .vstemplate file and .csproj.
The template parameters available are located at Visual Studio 2013 Template Parameters page. These template parameters are available and can be used on projects and item templates.
For example,
#region Using directives
using System;
using System.Collections.Generic;
using System.Text;
#endregion
namespace $safeprojectname$
{
    public class Class1
        {
            public Class1()
                {

                }
         }
}
When you create a new project, the $safeprojectname$ will be replaced with whatever you named your application. In this case, the name WebApplication1 was used and will look like the code below.
#region Using directives
using System;
using System.Collections.Generic;
using System.Text;
#endregion
namespace WebApplication1
{
    public class Class1
        {
            public Class1()
                {

                }
         }
}
If you've ever wondered why Visual Studio takes so long to create a new project, it takes time to unzip the project, scan EVERY file and perform a search and replace on all of the template parameters in the zip file. THEN, your project is all set and ready to go.
Of course, you can't run it (duh!).
After you're done editing all of your source code with template parameters, zip the project back up and overwrite the old template project.
The next time you create a new project, you'll have a completed, customized project that you built to jumpstart your development.
Conclusion
The best part about Visual Studio is the way that you can customize your development environment to match your style of coding in your applications. You can include any number of files including readme's, certain types of patterns that you HAVE to use, or create a project that uses a standard plugin format in a project. Start building your large library of pre-made apps that install at the touch of a button.
In the next part of this series, we'll talk about a code generator that has been in Visual Studio since 2005. His name is T4!
Series: How to take your ASP.NET MVC development to ludicrous speeds.
- Transforming XML/JSON/CSV into Classes
- Use pre-built applications
- T4 (Text Template Transformation Toolkit)
- ReSharper/SQL Complete
- ORM (Object Relationship Management)
Do you have unique way of building quicker applications? I'm interested! Post your comments below.


