Creating Custom Tuxboard Widgets
In today's post, we cover the process of building and adding new widgets to Tuxboard

What's Next?
- Introducing Tuxboard
- Layout of a Tuxboard dashboard
- Dashboard Modularity using Tuxboard
- Moving Widgets in Tuxboard
- Creating a Tuxbar for Tuxboard
- Managing Layouts in Tuxboard: Simple Layout Dialog
- Managing Layouts in Tuxboard: Advanced Layout Dialog
- Adding Widgets with a Tuxboard Dialog
- Using Widget Toolbars (or Deleting Widgets)
- Creating User-Specific Dashboards
- Creating Default Dashboards using Roles
- Creating Default Widgets using Roles
- Creating Custom Tuxboard Widgets
Full examples located at Tuxboard.Examples.
In the last post, we discussed how a user could view available widgets based on their roles in the application.
While widgets are a fundamental part of Tuxboard, this series of posts never mentioned how to create a widget.
Since widgets are a big thing with Tuxboard, there's a lot to cover. For this initial post, we'll break this into multiples posts to make it easier to digest.
In this post, we'll go over the process of creating a new Tuxboard widget.
Overview
To review the goals of Tuxboard,
- Easy Integration - Simple enhancement to applications
- Declarative first, Programmatic second - The concept of modifying Tuxboard using HTML, CSS, and JavaScript/TypeScript was more enticing than modifying code, then compiling. However, the option of writing code is available.
- Extensibility - Providing simple hooks at the programmatic and database level to speed up custom development requirements.
These three goals are always at the top of the list for easy dashboard development, but today, we focus on the "Extensibility" and "Easy Integration" part of Tuxboard.
Once a Tuxboard dashboard is running for users, the ability to create additional widgets was essential.
Since developers need a way to keep up with the latest news, we'll add a Stack Overflow Blog RSS feed widget.
Type of Widgets
There are two types of widgets in Tuxboard: Standard and Static.
- Standard - Widgets with a heading allowing users to interact with the widget's information/settings
- Static - Widget meant to display information with no interaction
The posts in series focused primarily on standard widgets. Static widgets are simply a box displaying information with no interaction or actions.
We'll get into static widgets in a later post.
Setup
We're using the source code from the last project (11-Creating-Default-Widgets / repository). Follow the steps under the "Getting Started" heading.
Once finished, we'll continue with the next section.
Creating the RSS Widget
When building a new widget, only two places are required to update: The Components folder and the database.
- ViewComponents folder - The folder (Pages\Shared\Components\) is the widget name containing the body of the widget.
- Widget / WidgetDefault / WidgetDefaultOption tables - These tables are what drives the adding of widgets to a dashboard
Let's break down each one and examine what's required to add the Stack Overflow Blog RSS Widget (Man, that's a mouthful...I'll just call it RSS Widget from now on).
Step 1: Creating the RSS [View]Component Folder
In Tuxboard, the term widget and ViewComponent are interchangeable. If you understand ViewComponents, then you already understand a widget in Tuxboard.
ViewComponents are absolutely essential in creating these "islands of HTML." As mentioned in the past, there are a lot of benefits to using ViewComponents.
To add the RSS Widget, create a folder called "Rss" under the Pages/Shared/Components folder and add the following files into the "Rss" folder.
Pages/Shared/Components/Rss/RssViewComponent.cs
using Microsoft.AspNetCore.Mvc;
using Tuxboard.Core.Domain.Entities;

namespace CreatingWidgets.Pages.Shared.Components.Rss;

[ViewComponent(Name = "rss")]
public class RssViewComponent : ViewComponent
{
    public IViewComponentResult Invoke(WidgetPlacement placement)
    {
        var rssFeed = new Uri("https://stackoverflow.blog/feed");

        var feed = new FeedReader(rssFeed).Get();

        var widgetModel = new RssWidgetModel { Placement = placement, Feed = feed };

        return View(widgetModel);
    }
}
Pages/Shared/Components/Rss/Default.cshtml
@model RssWidgetModel

<h6>@Model.Feed.Title.Text</h6>
<ul class="list-unstyled">
    @foreach (var feedItem in Model.Feed.Items.Take(Model.Limit))
    {
        <li>
            <p>
                <a href="@feedItem.Links.First().Uri.ToString()"
                   class="fw-bold">
                    @feedItem.Title.Text
                </a><br />
                @feedItem.Summary.Text
            </p>
        </li>
    }
</ul>
Pages/Shared/Components/Rss/FeedReader.cs
using System.ServiceModel.Syndication;
using System.Xml;

namespace CreatingWidgets.Pages.Shared.Components.Rss;

public class FeedReader
{
    private readonly Uri _rssFeed;

    public FeedReader(Uri rssFeed)
    {
        _rssFeed = rssFeed;
    }

    public SyndicationFeed Get()
    {
        using (var reader = XmlReader.Create(_rssFeed.AbsoluteUri))
        {
            var feed = SyndicationFeed.Load(reader);
            reader.Close();

            return feed;
        }
    }
}
Pages/Shared/Components/Rss/RssWidgetModel.cs
using System.ServiceModel.Syndication;
using Tuxboard.Core.Infrastructure.Models;

namespace CreatingWidgets.Pages.Shared.Components.Rss;

public class RssWidgetModel : WidgetModel
{
    public SyndicationFeed Feed { get; set; } = null!;
    public int Limit { get; set; } = 10;
}
One of the first steps is creating the RssViewComponent which accepts an instance of a WidgetPlacement object.
For convenience, we create a FeedReader class so we can immediately consume the Stack Overflow RSS feed.
The RssWidgetModel passes the data onto the view (default.cshtml). If you notice, we're allowing only 10 articles to display in the widget.
Once passed in, the data is rendered with links and a summary of each post.
Step 2: Adding the Widget Record
With the RSS widget created, we can now focus on adding the record to the Tuxboard tables.
The widget structure consists of the following tables:
- Widgets - Contains the primary header for all widgets throughout Tuxboard
- WidgetDefault - Using the WidgetID, contains all of the settings for the Widget
- WidgetDefaultOptions - (optional) If a widget setting includes a dropdown, the options are defined as records here
When a user adds a widget to their dashboard, these records are transformed from a Widget record into a WidgetPlacement record with corresponding default settings.
Using SSMS (SQL Server Management Studio), we can use SQL to insert a new record into the Widget table.
INSERT INTO Widget
SELECT
    newid() as WidgetId,
    'rss' as Name,
    'StackOverflow Blog RSS Feed' as Title,
    'Latest News from Stack Overflow''s Blog' as Description,
    '' as ImageUrl,
    'Programming' as GroupName,
    0 as Permission,
    1 as Moveable,
    1 as CanDelete,
    1 as UseSetting,
    1 as UseTemplate
Here's a breakdown of the inserted record:
- WidgetID - Auto-generated Identifier using the newid() function
- Name - The name of the widget used to identify the ViewComponent used. The name should match the ViewComponent attribute's name exactly (
[ViewComponent(name="rss")]) - Title - The title of the widget
- Description - The description of the widget
- ImageUrl - The image representing the widget; can be empty for no image since it's specifically for client-side icons.
- GroupName - Widget group's name when organizing your widgets.
- Permission - Defaulted to 0; future enhancement
- Moveable - Is the widget moveable on the dashboard? 1 for true, 0 for false.
- CanDelete - Can a user delete the widget? 1 for true, 0 for false.
- UseSetting - Does the widget contain settings? 1 for true, 0 for false. We'll get to this at a later time.
- UseTemplate - Does the widget need a template?
If 1, this creates the widget structure/border around the widget using the WidgetTemplate ViewComponent, then inserts the widget's body into the template (Standard widgets)
If 0, the widget will render without the widget heading/borders in theWidgetTemplateViewComponent (Static widgets)
Next is the WidgetDefault table. Each widget should contain at least one setting, usually a widget title.
Here's the SQL statement to add a Title setting to our RSS widget.
INSERT INTO WidgetDefault
SELECT
    newid() as WidgetDefaultId,
    '<EnterYourWidgetIdHere>' as WidgetId,
    'widgettitle' as SettingName,
    'Title' as SettingTitle,
    0 as SettingType,
    'Latest News from Stack Overflow' as DefaultValue,
    1 as SettingIndex
Again, let's break down each field to understand what's happening.
- WidgetDefaultID - Auto-generated Identifier using the
newid()function - WidgetID - This is the WidgetID from the widget header. Place the newly WidgetID from above here to associate the setting with the widget.
- SettingName - What is the programming name of the setting? This is unique name for each widget's setting.
- SettingTitle - The title of the setting. This will be used later when displaying widget settings (i.e. "Title:")
- SettingType - The type of input for this widget setting. The default value is 0 for text input.
- DefaultValue - The default value for this setting. Since this is the title, the default value is "Latest News from Stack Overflow."
- SettingIndex - The index of the setting in a list. This is important when displaying a list of settings for a user.
To confirm these records are connected properly, run this SQL statement.
SELECT
    w.Name,
    w.Title,
    w.Description,
    wd.SettingTitle,
    wd.DefaultValue
FROM Widget w
JOIN WidgetDefault wd on wd.WidgetId=w.WidgetId
WHERE w.WidgetId='<YourWidgetIdHere>'
The SQL statement above is definitely reusable for validating settings for a widget.

If everything looks good, users can add the latest widget to their dashboard.
Troubleshooting
While that's everything required to add a widget, there could be some problems. Let's look at some common issues (I know there's only one, but more will be added as they're asked).
- If the widget isn't appearing in the "Add Widget Dialog"
- It may be missing from the Widget table. Review this post to insert the widget and widget settings.
- They may not have permissions to add the widget to their dashboard. Review the previous post under the section titled "Updating the Database" to insert your new widget for all users.
Viewing the Results
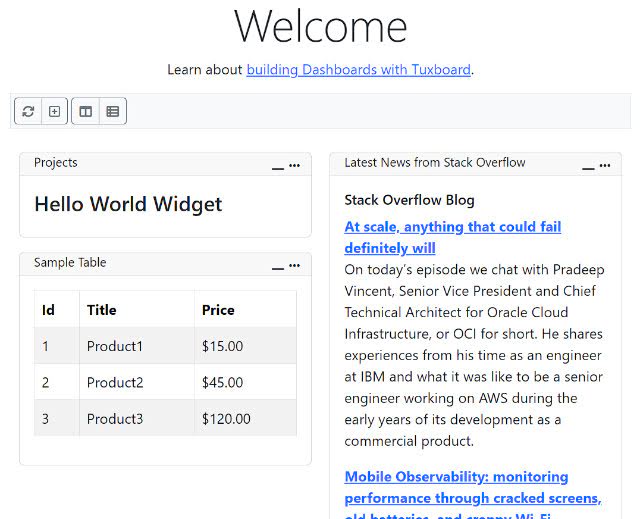
With our RSS widget now in place, users can add the widget to see the latest news from Stack Overflow.

Conclusion
In this post, we created a simple widget for users to view the latest news from Stack Overflow through an RSS feed.
The best part of this post is we'll continue to build and extend this example to show other features of Tuxboard like widget settings and how to defer rendering.
The repository for this post is the 12-Creating-Widgets at Tuxboard.Examples.
What's Next?
- Introducing Tuxboard
- Layout of a Tuxboard dashboard
- Dashboard Modularity using Tuxboard
- Moving Widgets in Tuxboard
- Creating a Tuxbar for Tuxboard
- Managing Layouts in Tuxboard: Simple Layout Dialog
- Managing Layouts in Tuxboard: Advanced Layout Dialog
- Adding Widgets with a Tuxboard Dialog
- Using Widget Toolbars (or Deleting Widgets)
- Creating User-Specific Dashboards
- Creating Default Dashboards using Roles
- Creating Default Widgets using Roles
- Creating Custom Tuxboard Widgets
Full examples located at Tuxboard.Examples.


