How to implement Swagger with Authorization
In today's post, our guest blogger Andrew Hinkle explains how to secure the interactive part of Swagger using authorization techniques

Swagger creates a great interactive visualization of your API that is self-documenting using the OpenAPI specification. Get started with Swashbuckle and ASP.NET Core provides guidance to add Swashbuckle (Swagger) to your .NET 5 API following the standard tutorial. Read this article to learn What is the difference between Swagger and OpenAPI?
If you're new to Swagger like me, you'll learn it's straightforward to add it to your solution and see the amazing results immediately. However, any slight derivation from the tutorials such as working with an Api with security applied may cause headaches and consternation.
As an example, if you've added security to your app, the interactive piece of the SwaggerUI no longer works as every time you want to Try it out, you get a 401 unauthorized. We'll use API Key security here to demo an app with security.
For this article, we're using a very heavily modified Todo API originally based on the standard Tutorial: Create a web API with ASP.NET Core Todo API. After all, real world apps are typically way different than the basic tutorials. Don't worry about all the differences or even how the API Key security is implemented except as noted. We'll be reviewing those differences in subsequent articles.
Let's clearly identify our goals here.
- Api is a pre-existing API project where the MVC – controllers are defined and stores the appsettings.json.
- Has a TodoController.
- Standard endpoint actions have XML comments for summary, parameter, etc.
- [ProducesResponseType…] attributes already exist. These describe the expected HTML Status codes that can be returned.
- Display the SwaggerUI for the TodoController regardless of Authorization.
- We want potential clients to see what our API offers.
- The SwaggerUI Try It Out feature:
- If not authorized should return 401 unauthorized.
- If authorized should call the API.
- Add a class library for reusable Swagger customization.
- Authorization logic is already defined.
- ApiHeader stores the customizable ApiHeader: "x-api-key".
- We want our Swagger class library to be versatile so apps that use a different header can still use this app.
- ApiHeader stores the customizable ApiHeader: "x-api-key".
There's a lot here, so let's get started.
Source Code is located here:
Create a new Tips.Swagger project
- Right-click the solution > Add New Project
- Class library (C# A project for creating a class library that targets .NET Standard or .NET Core)
- Click Next
- Project name: Tips.Swagger
- Location: default
- Click Next
- Target Framework: .NET 5.0 (Current)
Install the Swashbuckle.AspNetCore NuGet package
- Open your API in Visual Studio
- I'm using Visual Studio 2019 Enterprise
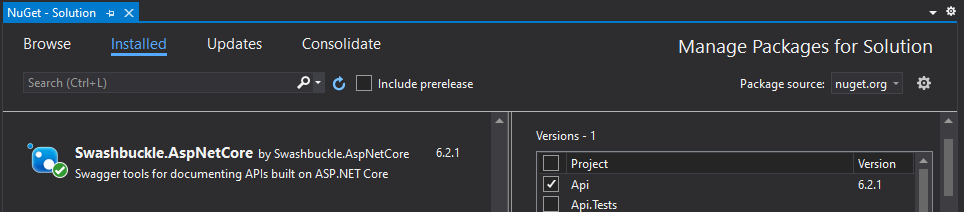
- Tools > NuGet Package Manager > Manage NuGet Packages for Solution…
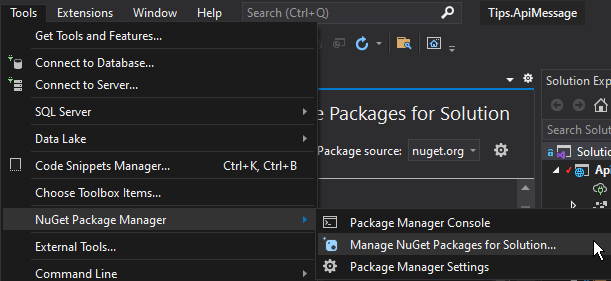
- Search for Swashbuckle.AspNetCore > select it
- Check the desired projects
- csproj project (the project with your MVC – controllers)
- Assembly name: Tips.Api
- Namespace: Tips.Api
- csproj
- Assembly name: Tips.Swagger
- Namespace: Tips.Swagger
- csproj project (the project with your MVC – controllers)
- Install
Tips.Api.csproj
- Add the following in bold to the PropertyGroup
- GenerateDocumentationFile node is required for Swagger to create the Tips.Api.xml file at compile time.
- NoWarn node is optional. It stops warnings for methods missing the XML comments.
- The Swashbuckle.AspNetCore entry was added when you installed the NuGet package.
Tips.ApiMessage/src/Api/Api.csproj
  <PropertyGroup>
    <TargetFramework>net5.0</TargetFramework>
    <StartupObject>Tips.Api.Program</StartupObject>
    <Nullable>annotations</Nullable>
    <AssemblyName>Tips.Api</AssemblyName>
    <RootNamespace>Tips.Api</RootNamespace>
    <GenerateDocumentationFile>true</GenerateDocumentationFile>
    <NoWarn>1701;1702;1591</NoWarn>
  </PropertyGroup>

  <ItemGroup>
    <PackageReference Include="Microsoft.Extensions.Logging.Log4Net.AspNetCore" Version="5.0.4" />
    <PackageReference Include="Microsoft.VisualStudio.Web.CodeGeneration.Design" Version="5.0.2" />
    <PackageReference Include="Swashbuckle.AspNetCore" Version="6.2.1" />
  </ItemGroup>
Tips.Api.Startup - Configure Swagger
- Update Startup.ConfigureServices > Add the text in bold
Tips.ApiMessage/src/Api/Startup.cs#L23-L29
public void ConfigureServices(IServiceCollection services)
{
    services.RegisterDependencies(_configuration);
    services.AddControllers();
    services.AddSwaggerWithApiKeySecurity(_configuration, $"{Assembly.GetExecutingAssembly().GetName().Name}");
}
- Update Startup.Configure > Add the text in bold.
Note: if you wanted to disable the Swagger Try it out feature, you can addc.SupportedSubmitMethods()and don't add theservices.AddSwaggerWithApiKeySecurityextension.
Tips.ApiMessage/src/Api/Startup.cs#L31-L52
public void Configure(IApplicationBuilder app, IWebHostEnvironment env, ILoggerFactory loggerFactory)
{
    loggerFactory.AddLog4Net();
    app.ConfigureExceptionHandler()
        .UseHttpsRedirection()
        .UseSwagger()
        .UseSwaggerUI(c =>
        {
            c.SwaggerEndpoint("/swagger/v1/swagger.json", "Todo Items v1");
            // https://stackoverflow.com/questions/55914610/disable-try-it-out-in-swagger
            //c.SupportedSubmitMethods();
        })
        .UseApiKeyHandlerMiddleware()
        .ConfigureHttpInfoLogger()
        .UseRouting()
        .UseAuthorization()
        .UseEndpoints(endpoints =>
        {
            endpoints.MapControllers();
        });
}
Tips.Api.appsettings.json
In this demo, the ApiHeader is customizable and defined in the appsettings.json.
Tips.ApiMessage/src/Api/appsettings.json#L13-L14
{
  ...
  "ApiKeyConfiguration": {
    "ApiHeader": "x-api-key",
    ...
  }
  ...
}
Tips.Swagger.ApiKeyConfiguration
In this demo the ApiHeader is customizable and bound to the ApiKeyConfiguration class. There's actually more in the appsettings.json ApiKeyConfiguration node. The Swagger extension we're writing only needs this one entry, so we keep it very specific to our needs.
Tips.ApiMessage/src/Swagger/ApiKeyConfiguration.cs#L1-L7
namespace Tips.Swagger
{
    public class ApiKeyConfiguration
    {
        public string ApiHeader { get; set; }
    }
}
Tips.Swagger.AddSwaggerWithApiKeySecurity extension
Let's highlight some key concepts and then display the Swagger extension entirely afterwards.
Bind the ApiKeyConfiguration
Bind the ApiKeyConfiguration so we may access the ApiKeyHeader. If the ApiKeyHeader does not change, just hard code it later in the method where we set apiKeyConfiguration.ApiHeader. Just realize it won't be as reusable in other APIs if you use different api key headers.
Tips.ApiMessage/src/Swagger/Extensions/SwaggerExtensions.cs#L13-L18
public static void AddSwaggerWithApiKeySecurity(this IServiceCollection services,
    IConfiguration configuration, string assemblyName)
{
    var apiKeyConfiguration = new ApiKeyConfiguration();
    configuration.Bind(nameof(ApiKeyConfiguration), apiKeyConfiguration);

    if (string.IsNullOrEmpty(apiKeyConfiguration?.ApiHeader))
        throw new InvalidOperationException("ApiKeyConfiguration.ApiHeader is null or empty.");
AddSwaggerGen – AddSecurityDefinition
Define the OpenApi security scheme to use ApiKey. Basically, this say in the Http Headers get the ApiHeader "x-api-key" and apply it as an ApiKey.
Tips.ApiMessage/src/Swagger/Extensions/SwaggerExtensions.cs#L20-L31
// https://docs.microsoft.com/en-us/aspnet/core/tutorials/getting-started-with-swashbuckle?view=aspnetcore-5.0&tabs=visual-studio
services.AddSwaggerGen(c =>
{
    const string securityDefinition = "ApiKey";

    // https://stackoverflow.com/questions/36975389/api-key-in-header-with-swashbuckle
    c.AddSecurityDefinition(securityDefinition, new OpenApiSecurityScheme
    {
        In = ParameterLocation.Header,
        Name = apiKeyConfiguration.ApiHeader,
        Type = SecuritySchemeType.ApiKey
    });
AddSwaggerGen – AddSecurityRequirement
Adding the security definition is all well in good but doesn't mean a lick unless it's defined as a requirement for your API endpoints. Thankfully, you can apply that globally here as well. Make sure to match the schemes and reference the securityDefinition by name.
Tips.ApiMessage/src/Swagger/Extensions/SwaggerExtensions.cs#L32-L45
// https://stackoverflow.com/questions/57227912/swaggerui-not-adding-apikey-to-header-with-swashbuckle-5-x
c.AddSecurityRequirement(new OpenApiSecurityRequirement
{
    {
        new OpenApiSecurityScheme
        {
            Name = apiKeyConfiguration.ApiHeader,
            Type = SecuritySchemeType.ApiKey,
            In = ParameterLocation.Header,
            Reference = new OpenApiReference { Type = ReferenceType.SecurityScheme, Id = securityDefinition }
        },
        new List<string>()
    }
});
AddSwaggerGen – Store the definition in XML
Swagger assumes the XML is generated and stored with the site. This is where we need to know the assembly's name of the Api project to properly name the XML file.
Tips.ApiMessage/src/Swagger/Extensions/SwaggerExtensions.cs#L32-L45
var xmlFile = $"{assemblyName}.xml";
var xmlPath = Path.Combine(AppContext.BaseDirectory, xmlFile);
c.IncludeXmlComments(xmlPath);
Reusability concerns
These concerns are more related to dependency injection and decisions made. Notes for myself. ??
- You could keep this extension along with the ApiKeyConfiguration in the same Api project (the project with your MVC controllers) and adjust the namespace. However, I chose not to so we could reuse this extension in other APIs.
- I chose not to reuse the Security project's ApiKeyConfiguration, because it represents a lot more information than we care about. It does add an unseen dependency that if the location of the ApiHeader entry changes, I must update references in two places. Some Domain Driven Design concepts considered in this decision.
- I can't reuse the Security projects ApiKeyConfiguration without adding a dependency on the Security project and changing our approach of using the static extension technique to something that works with DI. There are other concerns, but they're related to these concepts.
Tips.Swagger.AddSwaggerWithApiKeySecurity extension – full code
Tips.ApiMessage/src/Swagger/Extensions/SwaggerExtensions.cs#L1-L53
using System;
using System.Collections.Generic;
using System.IO;
using Microsoft.Extensions.Configuration;
using Microsoft.Extensions.DependencyInjection;
using Microsoft.OpenApi.Models;

namespace Tips.Swagger.Extensions
{
    public static class SwaggerExtensions
    {
        public static void AddSwaggerWithApiKeySecurity(this IServiceCollection services,
            IConfiguration configuration, string assemblyName)
        {
            var apiKeyConfiguration = new ApiKeyConfiguration();
            configuration.Bind(nameof(ApiKeyConfiguration), apiKeyConfiguration);

            if (string.IsNullOrEmpty(apiKeyConfiguration?.ApiHeader))
                throw new InvalidOperationException("ApiKeyConfiguration.ApiHeader is null or empty.");

            // https://docs.microsoft.com/en-us/aspnet/core/tutorials/getting-started-with-swashbuckle?view=aspnetcore-5.0&tabs=visual-studio
            services.AddSwaggerGen(c =>
            {
                const string securityDefinition = "ApiKey";

                // https://stackoverflow.com/questions/36975389/api-key-in-header-with-swashbuckle
                c.AddSecurityDefinition(securityDefinition, new OpenApiSecurityScheme
                {
                    In = ParameterLocation.Header,
                    Name = apiKeyConfiguration.ApiHeader,
                    Type = SecuritySchemeType.ApiKey
                });
                // https://stackoverflow.com/questions/57227912/swaggerui-not-adding-apikey-to-header-with-swashbuckle-5-x
                c.AddSecurityRequirement(new OpenApiSecurityRequirement
                {
                    {
                        new OpenApiSecurityScheme
                        {
                            Name = apiKeyConfiguration.ApiHeader,
                            Type = SecuritySchemeType.ApiKey,
                            In = ParameterLocation.Header,
                            Reference = new OpenApiReference { Type = ReferenceType.SecurityScheme, Id = securityDefinition }
                        },
                        new List<string>()
                    }
                });

                var xmlFile = $"{assemblyName}.xml";
                var xmlPath = Path.Combine(AppContext.BaseDirectory, xmlFile);
                c.IncludeXmlComments(xmlPath);
            });
        }
    }
}
Tips.TodoItemsController
If you haven't already, update your controller to include the standard xml comments along with the attribute [ProducesResponseType]. I've included one example as a reference. Note that if your endpoint action has parameters with [FromServices], these parameters are rightfully ignored when Swagger generates the UI.
Tips.ApiMessage/src/Api/Controllers/TodoItemsController.cs#L72-L102
/// <summary>
/// Update a single to do item.
/// </summary>
/// <param name="handler"></param>
/// <param name="problemDetailsFactory"></param>
/// <param name="id"></param>
/// <param name="todoItem"></param>
/// <returns></returns>
// PUT: api/TodoItems/5
// To protect from overposting attacks, please enable the specific properties you want to bind to, for
// more details see https://aka.ms/RazorPagesCRUD.
[ProducesResponseType(StatusCodes.Status204NoContent)]
[ProducesResponseType(StatusCodes.Status400BadRequest)]
[ProducesResponseType(StatusCodes.Status404NotFound)]
[ProducesResponseType(StatusCodes.Status500InternalServerError)]
[HttpPut("{id}")]
public async Task<IActionResult> UpdateTodoItem(
    [FromServices] IRequestHandler<UpdateTodoItemRequest, Response> handler,
    [FromServices] IProblemDetailsFactory problemDetailsFactory,
    long id, TodoItem todoItem)
{
    var request = new UpdateTodoItemRequest { Id = id, Item = todoItem };

    var response = await HandleAsync(handler, request);

    if (response.IsNotFound()) return NotFound();

    if (response.HasErrors()) return BadRequest(problemDetailsFactory.BadRequest(response.Notifications));

    return NoContent();
}
Test
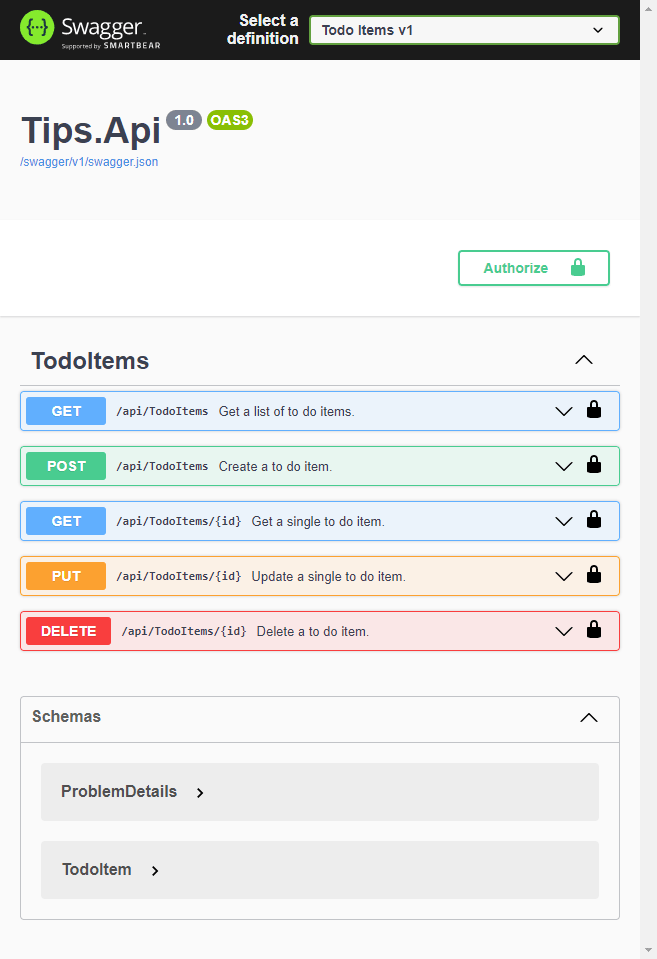
If all went well, when you run your API you can open a browser and navigate to your swagger page. The url was defined in the Tips.Api.Startup.
c.SwaggerEndpoint("/swagger/v1/swagger.json", "Todo Items v1");
- https://localhost:{port}/swagger/index.html
- Example: https://localhost:44305/swagger/index.html
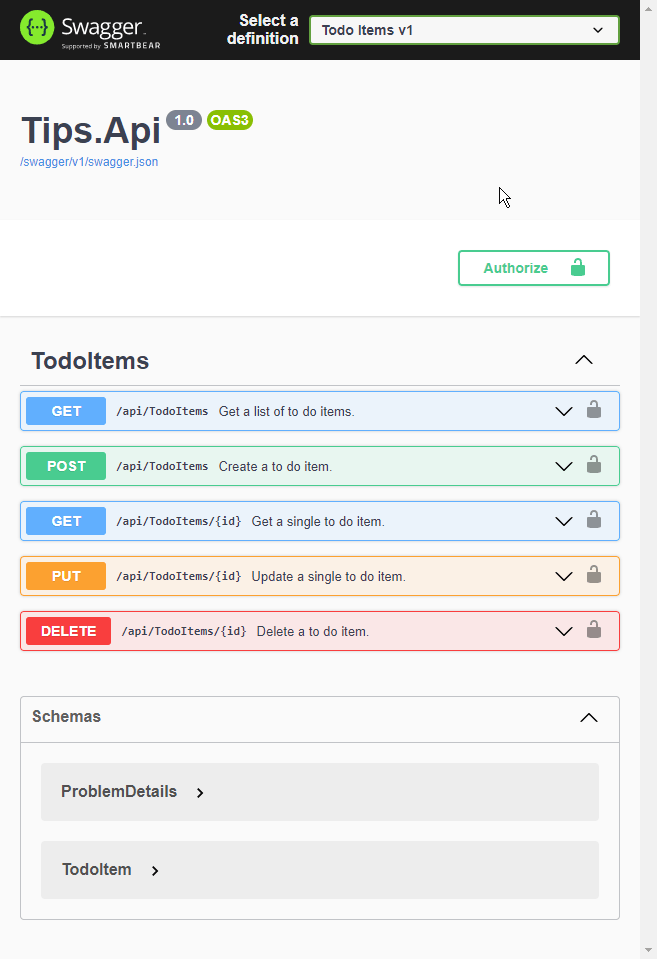
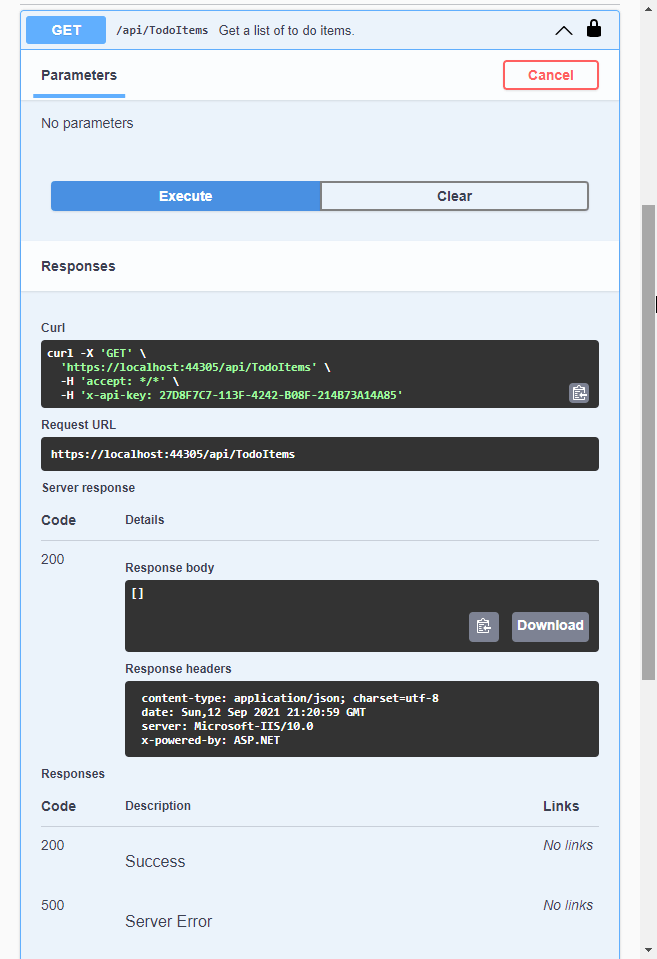
- Expand the first Get > click Try it out > click execute
- You get 401 access denied
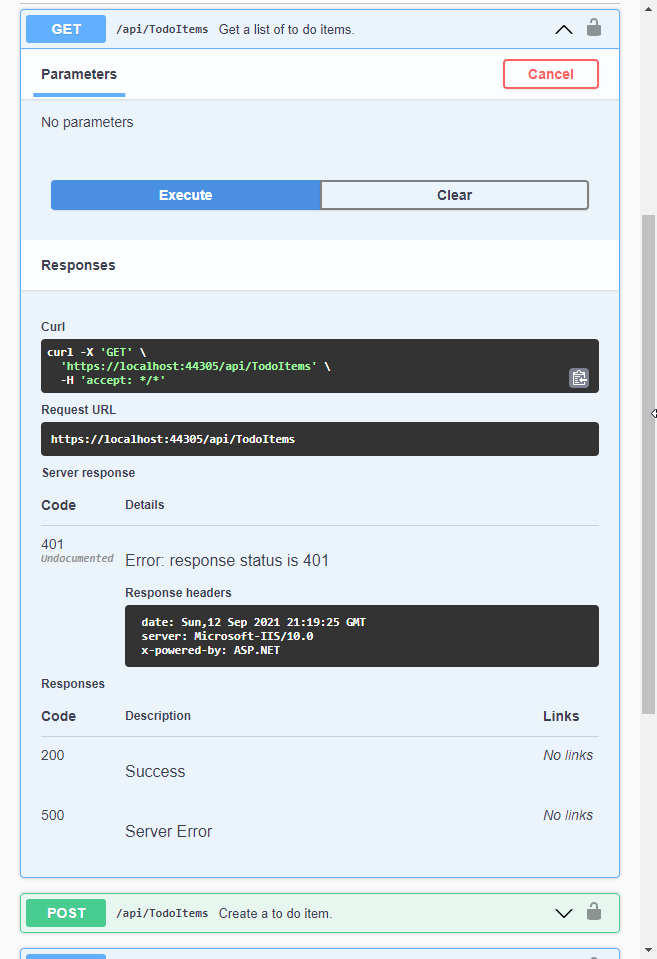
- You get 401 access denied
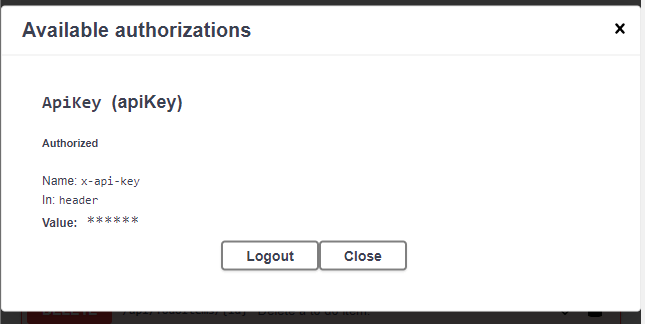
- Click Authorize > Fill in the value > click Authorize > click close
- Value: {enter an ApiKey value}
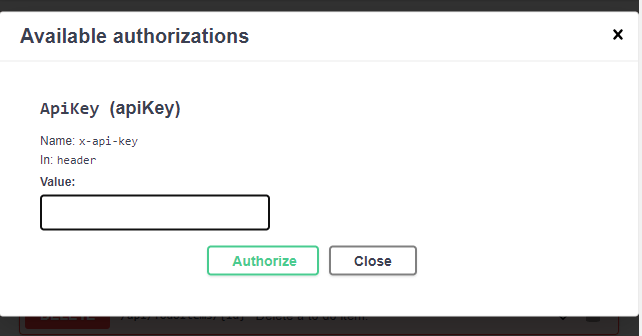
- Value: {enter an ApiKey value}
- All the locks are now locked.
- Success!
Troubleshooting
The Authorize button is missing.
- Make sure you applied the AddSecurityDefinition in the extension method.
The lock symbol is missing next to each endpoint action.
- Make sure you applied the AddSecurityRequirement in the extension method.
Considerations
- For secure APIs, consider exposing Swagger for all lower environments, but not production.
- This allows your authorized clients to see Swagger where they need it, when they're developing an integration to it.
- Consider creating an ApiKey specifically for Swagger.
- This gives you control to process the records differently, such as returning expected results without persisting test data to your databases.
- Give it limited functionality. Allows the potential clients the ability to call public endpoints that return partial data as an example.
- Consider disabling the Try it out feature.
- No need to expose yourself to test data when you just want to show how to use your API.
Conclusion
I've added Swagger to a pre-existing Api and separated reusable Swagger setup to a different project. I then applied ApiKey security to Swagger allowing us to login and truly use the Swagger Try it out feature. I also tested the feature, provided some troubleshooting, and offered some considerations.
I'm new to implementing Swagger and its best practices. I would love to hear from others and their experiences. What best practices do you follow? Did I miss anything? What could I improve here?


