Creating Multi-Tier Subscriptions using C#
It's always best to give options to users when it comes to subscriptions. Today, we introduce a unique way to attach application features to a subscription

Notice: This post was written for the Sixth Annual C# Advent Calendar (#csadvent). <commercial-voice> For the entire month of December, you can receive more than 60 articles geared towards C# for the very low price of $0.00!</commercial-voice> Thanks a lot to Matt Groves (@mgroves) for putting this together again! Once again, awesome job, Matt!
When developers get the call to build a product from scratch, the first approach running through their mind is how to build the product.
We’ve all been there. As developers, we look at the immediate functionality and envision a path as to how to get something created in the shortest amount of time. We mold the core of the product.
Basically, how can I get an MVP working in the shortest amount of time?
If you’re a independent developer (or entrepreneur of sorts), your product should be customized to a team of one as well as a team of 50.
For new customers, they want to experience your product first. Once they find the value, present them with the product features at every level and offer them the opportunity to upgrade based on their requirements.
This is why most products have subscription levels such as Silver, Gold, or Platinum. Another approach I’ve seen is the Freemium models like Free, Premium, Professional, and Enterprise. As an example, when a user signs up, they could choose a silver, gold, or platinum subscription.
Along with choosing the subscription, what features are included with each tiered subscription plan? Are they allowed to have 5 product ads in a silver level, 10 product ads in a gold level, or 20 product ads in a platinum tier?
How do you add this “feature” to your product in an extendable way?
What is a Multi-tiered Subscription Model?
When you visit a website, you have the option of signing up for either a free or premium models. Some websites simply want your email address and leave it at that.
However, for other websites who want to keep their visitors, they use subscriptions for their business model.
Subscription models allow the user to grow based on the user’s needs at the time.
So what's the difference between a Feature Flag and a Multi-tiered Subscription Model?
At first glance, this sounds a lot like a feature flag which a number of companies use throughout their software process. However, there is a difference between the two terms.
A feature flag is a way to enable/disable a larger portion of an application to become accessible to users on a global level. This is more on an abstracted level of your application and pertains more to DevOps than on an application level.
A multi-level subscription model offers a more granular, user-specific approach to an application where it's based on a user's subscription level. For example, if a user subscribes to a gold level, they're restricted to a certain number of features or number of items until they decide to subscribe to a higher level (maybe a platinum level?)
Subscription models give individual users a choice. Product owners usually create a feature matrix for the product.
What is a Feature Matrix?
If you've been on the web for a while, you've no doubt seen web sites offering various subscription levels as we’ve previously mentioned.
One popular subscription model is the Freemium model. The Freemium concept provides basic services of the web site for free until you outgrow the free features.
Once you outgrow the basic features, you require the next level of features to suit your needs which is where Premium pricing starts.
But how does that work on the back-end?
When a person first visits your site, they want to know what they'll get when they sign up. This is where a feature matrix is helpful.
If you have a subscription model, a feature matrix is critical to your strategy. It requires you to take a step back, look at your product as a whole, and ask what parts of the product can be segmented.
I understand this may venture into new territory for developers who don’t like the ‘M’ word (Yes...Marketing), but independent developers should be able to see this in their own products if they want their product to take off.
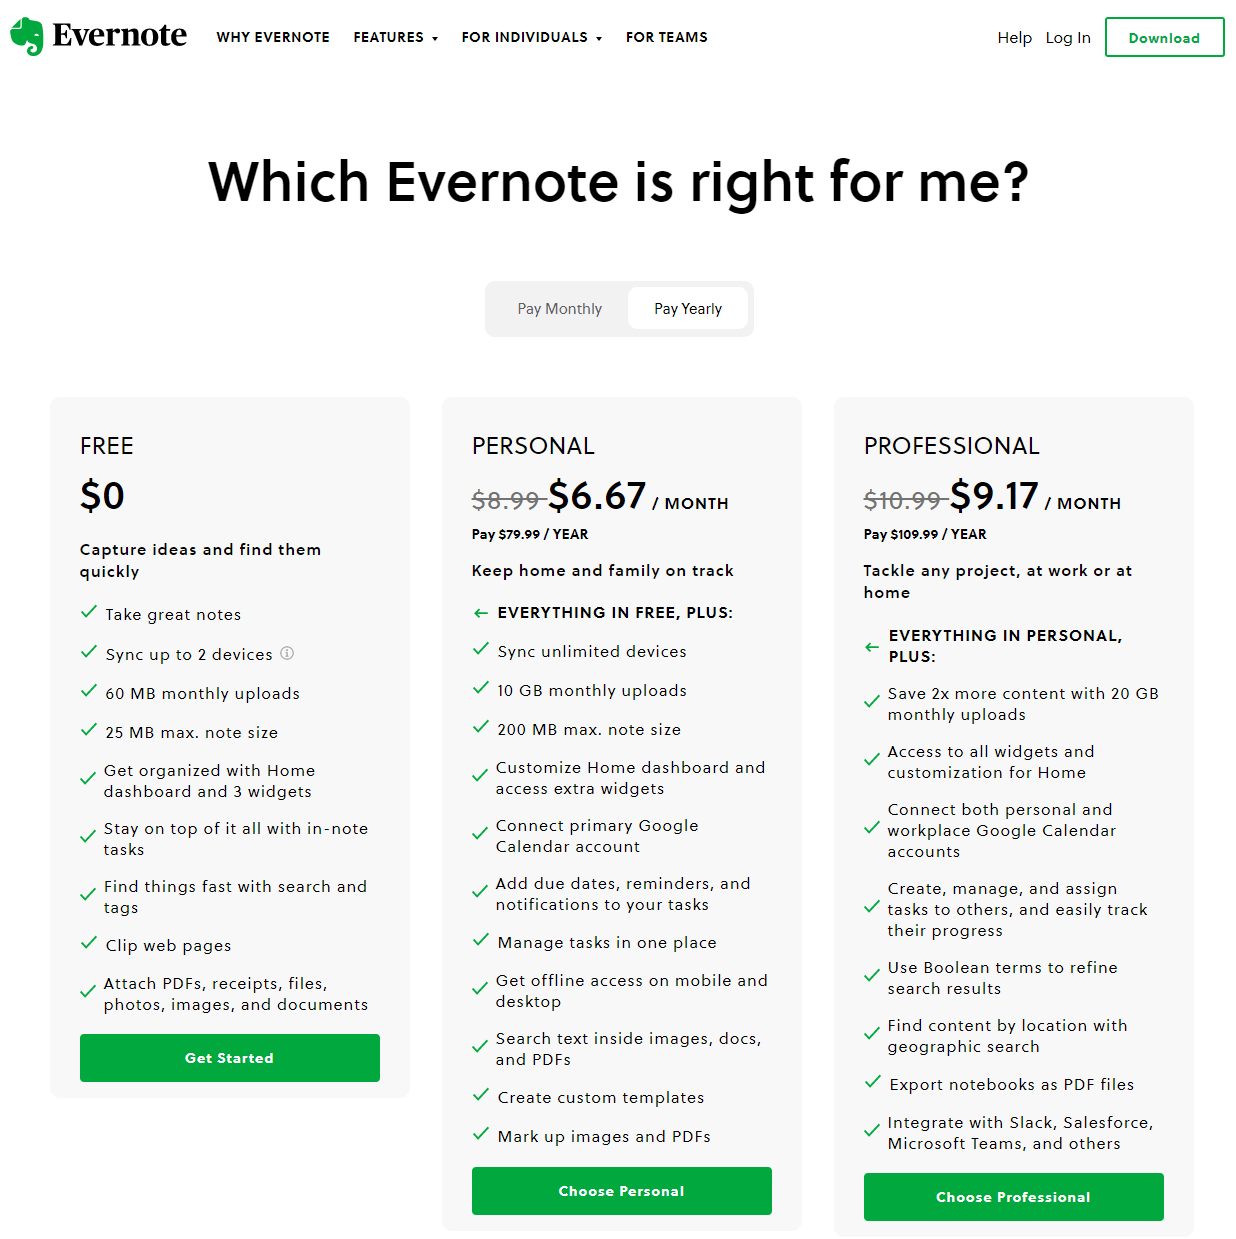
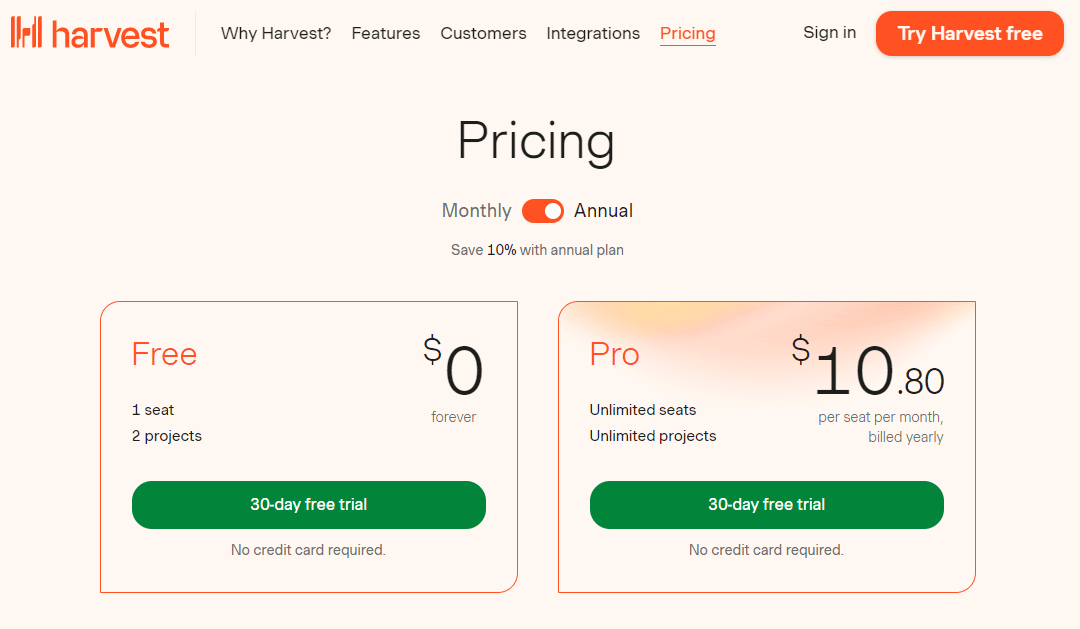
Below are some examples of multi-level subscription models.
Evernote
GetHarvest.com
Trello
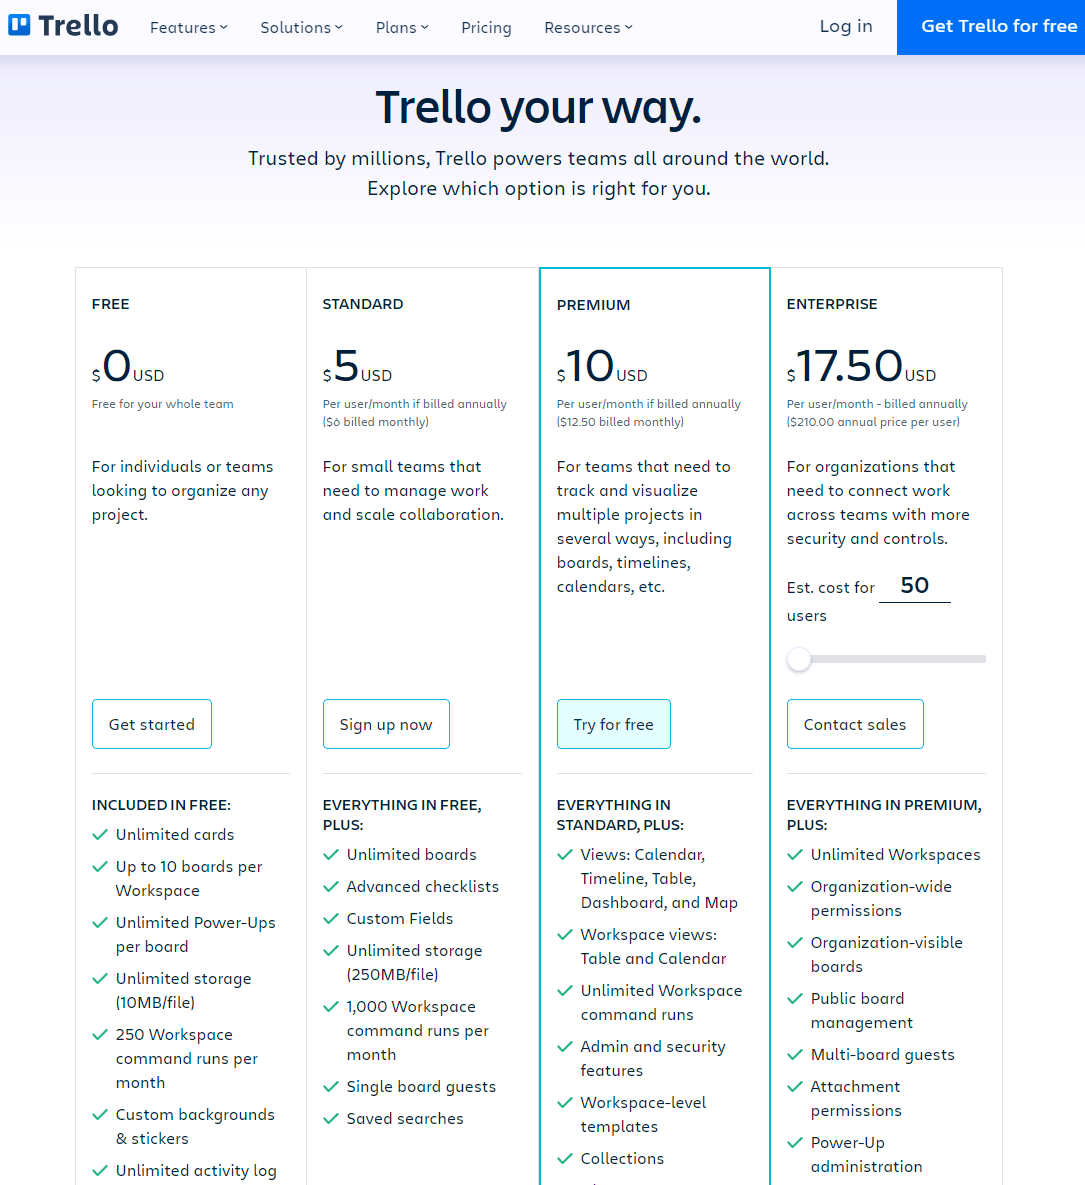
As you can see, the subscription model is becoming a standard for how companies accommodate customer needs. It's great to have choices!
Seriously, this type of approach can reach a large number of customers based on their needs at the time.
Before we get started with any kind of code, you first need to define what features can be expanded upon in your product.
A feature matrix explains to you (and the customer) what are the benefits available at each subscription level.
Creating Your Feature Matrix
To start building your feature matrix for your product, follow these steps.
1. Change Your Perspective
No one knows your product better than you so take off your developer hat and put on your customer hat.
Take a tour through your product as a customer and examine certain sections of the application.
Be mindful of the following on your tour:
- Logically partition your application - How big is the application? Can sections of the application actually become features?
- Can you limit a number of items to a specific number? - For example, a free subscription plan could only allow 5 projects where a professional plan could expand it to 25.
- Is the feature dependent on another feature? - Confirm one feature in one plan isn't dependent on another feature in another subscription plan. This may cause some disruption during a users’ stream of work.
Take a step back, look at the product, and honestly ask yourself “what features would a customer want from your product?”
This may open your eyes to what’s missing from your product and create opportunities for future product releases.
Here's a sample feature matrix we'll be using for our example.
| Feature | Basic | Professional | Corporate |
|---|---|---|---|
| Maximum Projects | 5 | 25 | Unlimited |
| Ability to create vendors | No | Yes | Yes |
| Auto-send Emails on Update | No | No | Yes |
2. Write down EVERY feature
Since you’ve toured your product, we need to capture all of the features. Don’t group them, just write them down.
Some examples would be:
- Constraints of particular entities (i.e. Number of projects, Limit of how many users)
- Access to <section of your application>
- Ability to send <number> emails
- Manage <number> subscribers
- Size limits on attachments
I would recommend examining other subscription plans and create similar paths for your own product.
3. Determine the Subscription Levels
These are the high-level subscription plans for your customers.
They can be as simple as Free and Premium or as complicated as a 5-tier subscription plan like Silver, Gold, Platinum, Emerald, and Diamond.
Mark each subscription level with an icon or some symbol to clearly identify each subscription plan.
4. Segment the Features
Start with the lowest subscription level and begin to group the features.
Look over your feature list and determine what is the simplest functionality of your core product.
Move to the next level and repeat the process. You may be able to reuse a feature from a previous plan. For example, a Free plan allows someone to use 5 items in your product where if you updated to the Premium plan, you can use 50 items.
Another feature could allow access to another area of the application to further assist with their workflow.
5. Fine tune the Feature Matrix
Once you have every feature identified, write up your completed feature matrix.
For the entirety of this post, we’ll use the simple feature matrix from above for our fake product.
While this feature matrix is limited in size, it provides a simple example for building out complex software products.
Oh, and it makes marketing extremely happy.
Database Schema
Now we come to the part of the article where we need a way to store the data.
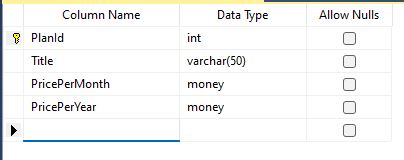
Based on the table in the previous section, this gives us the following schema.
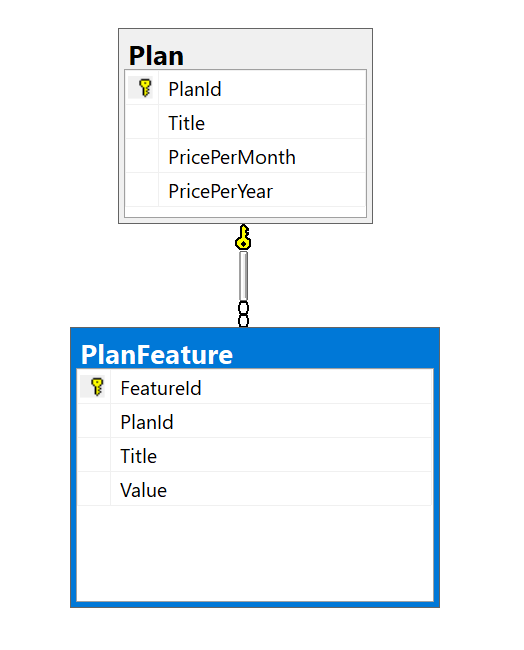
Pretty basic.
Plan Table
We store our subscription levels in the title field: Basic, Professional, and Corporate.
I also added a PricePerMonth and PricePerYear field.
PlanFeature Table
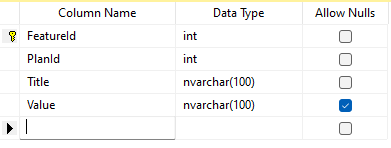
This table relates to every feature based on each Plan.
A few important notes regarding the table values for our product.
- If the Value field is NULL, the presence of this record means it’s available at this subscription level.
- For “Unlimited Projects” in the Corporate subscription level, we set the value to zero.
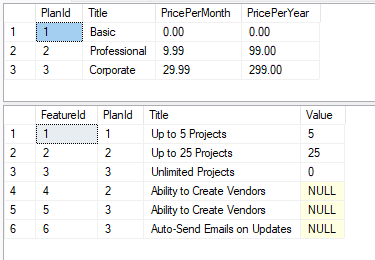
Here’s the records based on our feature matrix.
Records In Each Table
With both tables defined, they now look like this.
Now we can move forward with writing code (FINALLY!)
Associating a User to a Subscription Plan
When a user signs into your product, you usually have a UserId to associate with a user.
If you are using Microsoft Identity, you have two options to relate a user to a subscription plan.
- Add a new property called PlanID to the ApplicationUser class, or
- If you’re more of a purist and don’t want to muddy the ApplicationUser class, you can create a new association table containing only a UserId and PlanId.
This gives you maximum flexibility with various features across the application.
If you aren’t using Microsoft Identity, you can duplicate this approach by locating the user’s Id as a key along with the PlanId in an association (or junction) table.
The whole idea is to relate your ID (PlanId), whether it's an integer or GUID, to a currently logged-in user.
Accessing Features In Your Application
We’ve built our table for each pricing plan and are now ready to generate our service to access these features values across the application.
But before we start writing our services, the type of features in an application can vary between something very simple (i.e. a number of items) to accessing a complex subsystem (i.e. access to the Human Resources area).
These features in your application are not meant to be flexible per se. They work in conjunction with your authentication and authorization of your application.
What I’m addressing is the hard-coded aspect of the application; The need to identify a feature with it’s associative value (or existence) is critical in your application.
Defining the Plan and Features
Besides Extension Methods, another programming paradigm I love are Enumeration Classes. I have to agree these classes are easier to extend and extremely similar in style to enums.
So I decided to create a PlanType and AppFeature enumeration classes.
Models\PlanType.cs
public class PlanType : Enumeration
{
    public static readonly PlanType Basic = new(1, "Basic");
    public static readonly PlanType Professional = new(2, "Professional");
    public static readonly PlanType Corporate = new(3, "Corporate");

    private PlanType(int id, string displayName)
        : base(id, displayName) { }
}
Models\AppFeature.cs
public class AppFeature : Enumeration
{
    public readonly int[] IdList;
    public readonly bool ZeroAsUnlimited;

    public static readonly AppFeature ProjectSize = new(0, "Project Size", new[] { 1, 2, 3 }, true);
    public static readonly AppFeature CreateVendors = new(1, "Can Create Vendors", new[] { 4, 5 });
    public static readonly AppFeature AutoSendEmailsOnUpdates = new(2, "Auto-Send Emails on Update", new[] { 6 });

    private AppFeature(int id, string displayName, int[] identifiers, bool zeroAsUnlimited = false)
        : base(id, displayName)
    {
        IdList = identifiers;
        ZeroAsUnlimited = zeroAsUnlimited;
    }
}
One of the questions someone asked about this approach is why not just create the entire plan and plan features in code?
For three reasons:
- These classes are small enough where we can reference minimal information to get the data we need.
- Making the right fields (like cost) data-driven is key to the system.
- We can add a caching mechanism onto this and have everything in memory when they sign on. As they say, "the best database call is no call at all."
Remember what I said above about your feature list must be hard-coded into your system?
As you can see in the AppFeature.cs, we defined each and every feature and how it relates to a plan type (by IdList).
For example, if we are in the Projects area of the system, we need to know how many projects a user can retrieve so we will identify this feature with the AppFeature.ProjectSize and find out how many we can load.
This is what I meant by hard-coding the call. Sure, you can use integers and GUIDs throughout the system, but developers should know what feature they are accessing whether it's the CreateVendors feature or the ProjectSize feature instead of the number 1 feature and number 2 feature. It's easier by name.
Feature Model: "It's Not a Bug, ..."
Next, we'll focus on the system's Feature model. The feature service (which we'll build soon) will combine the AppFeature along with the values from the tables.
Models\Feature.cs
public class Feature
{
    public AppFeature AppFeature { get; set; }
    public string Value { get; set; }
    public bool Allowed { get; set; }

    public int AsInt => int.TryParse(Value, out var result)
        ? result
        : 0;

    public bool ZeroAsUnlimited =>
        AppFeature.ZeroAsUnlimited
        && Value == "0"
        && AsInt == 0;
}
Value is defined as a string for other types of data, but for specific features, we may want it as an integer which is why I created the AsInt property to make things a little easier.
Some features require a certain value to be unlimited when they reach the top of their subscription level. The ZeroAsUnlimited property tests the value and AppFeature to see if it's considered an unlimited feature.
"We Need Service Over Here!"
Finally, we get to the feature service to use throughout our application.
The FeatureService is what will be dependency injected through the constructor so we can retrieve the feature user settings based on their subscription level and feature in the application.
Services\IFeatureService.cs
public interface IFeatureService
{
    Plan Get(PlanType planType);
    Feature FindFeature(AppFeature appFeature, PlanType planType);
}
Services\FeatureService.cs
public class FeatureService : IFeatureService
{
    private readonly IFeatureDbContext _context;

    public FeatureService(IFeatureDbContext context)
    {
        _context = context;
    }

    public Feature FindFeature(AppFeature featureEnum, PlanType planId) =>
        GetFeaturesByPlanId(planId)
            .FirstOrDefault(e =>
                e.AppFeature.Value.Equals(featureEnum.Value));

    public Plan Get(PlanType planType) =>
        _context.Plans.FirstOrDefault(e => e.PlanId.Equals(planType.Value));

    private List<PlanFeature> GetFeaturesFor(PlanType planType) =>
        _context.PlanFeatures
            .Where(e => e.PlanId.Equals(planType.Value))
            .ToList();

    private string GetFeatureValue(PlanFeature feature)
    {
        return feature == null || string.IsNullOrEmpty(feature.Value)
            ? string.Empty
            : feature.Value;
    }

    private IEnumerable<Feature> GetFeaturesByPlanId(PlanType planType)
    {
        var features = GetFeaturesFor(planType);

        return Enumeration
            .GetAll<AppFeature>()
            .Select(af =>
            {
                var feature = features.FirstOrDefault(e =>
                    af.IdList.Contains(e.FeatureId));
                return new Feature
                {
                    AppFeature = af,
                    Value = GetFeatureValue(feature),
                    Allowed = feature != null
                };
            });
    }
}
The first two methods are the bulk of what we'll be using in the application.
The IFeatureDbContext will be your DbContext passed in through the constructor. The only DbSet's used are the Plans and PlanFeatures tables.
The FindFeature method is the main method for locating a particular value for a feature in your application. Once you identify the feature through an AppFeature, you can get the value or determine whether it's allowed or not.
How To Use It?
Here is the checklist of items you should have completed before testing the code.
- Created your records in the Plans table and PlanFeatures table? Check!
- Duplicate the Plans table through the PlanType enumeration class? Check!
- Duplicate the PlanFeatures table through the AppFeature enumeration class? Check!
Once everything is set, add the IFeatureService to your Startup.cs (and optionally your DbContext containing your Plans and PlanFeatures tables).
services.AddTransient<IFeatureService, FeatureService>();
services.AddTransient<IFeatureDbContext, ApplicationDbContext>();
I used the standard ASP.NET Core Web App and modified the main page to see if everything worked properly.
The IndexModel on the Index page looks like this.
Pages\Index.cshtml.cs
public class IndexModel : PageModel
{
    private readonly ILogger<IndexModel> _logger;
    private readonly IFeatureService _featureService;

    public Feature Feature { get; set; }
    public Plan Plan { get; set; }

    public IndexModel(
        ILogger<IndexModel> logger,
        IFeatureService featureService)
    {
        _logger = logger;
        _featureService = featureService;
    }

    public void OnGet()
    {
        // grab the PlanId based on a user's subscription plan if you want.
        // var plan = GetByUser(User);
        var plan = PlanType.Basic;

        Plan = _featureService.Get(plan);
        Feature = _featureService.FindFeature(AppFeature.ProjectSize, plan);
    }
}
Once we find the feature based on their subscription level, we can display it on the page.
Pages\Index.cshtml
<div>
    You are allowed to have <strong>@(Model.Feature.ZeroAsUnlimited ? "Unlimited" : Model.Feature.Value)</strong>
    projects for your <strong>@Model.Plan.Title</strong> subscription
    which is <strong>@($"{Model.Plan.PricePerMonth:C2}/month") or @($"{Model.Plan.PricePerYear:C2}/annually")</strong>
</div>
The source code is found at the following repository.
Conclusion
In this post, we defined the difference between a feature flag and a multi-tier subscription, defined plans and features in a sample application, created a simple schema to store the data, and wrote a simple FeatureService to be dependency-injected.
This post was originally going to be an small ebook, but decided to write this for the C# Advent Calendar.
I hope this post kickstarts any entrepreneurial developers interested in using this technique for selling their product with subscription plans.
Merry Christmas to everyone!
Do you have an existing product with subscription levels? How could you make this more flexible? Post your comments below and let's discuss.


