Conditionally Enabling and Disabling DOM Elements
Today, we cover a technique on how to enable and disable a group of elements through an array of validations.

Web applications are becoming more and more difficult to write when it comes to complex business logic on the front-end.
Depending on the complexity, it may require you to take a group of inputs and validate those elements before pressing submit.
A recent screen I worked on required a number of DOM elements to be in a certain state before a submit or "action" button was enabled.
When a group of DOM elements are in a particular state we want to trigger other elements.
I know what you're thinking. Why not just use jQuery for the validations?
Here's why:
- For this task, we would need jQuery and the unobtrusive validations library. That's two large libraries we really don't need.
- With the latest JavaScript features, you'd be amazed how much functionality is already in the browser and how you may not even need jQuery anymore.
- I wanted a quick and tidy solution to this problem.
With that said, I set off to look for an easier way to conditionally validate groups of DOM elements.
A Simple Example
Let's set up a simple scenario with a grid.

Views/Home/Index.cshtml
@model EventViewModel
@{
    ViewData["Title"] = "Grouped Validations";
}
<style>
    th:nth-child(1) {
        width: 20px
    }
</style>

<h2>Events</h2>

@using (Html.BeginForm())
{
    <div class="btn-toolbar mb-3" role="toolbar" aria-label="Toolbar with button groups">
        <div class="btn-group mr-2" role="group" aria-label="First group">
            <button id="enabled-button" type="button" disabled="disabled" class="btn btn-info disabled">Enable</button>
            <button id="disabled-button" type="button" disabled="disabled" class="btn btn-info disabled">Disable</button>
        </div>
    </div>

    <table class="table table-condensed table-bordered table-striped">
        <thead>
        <tr>
            <th><input type="checkbox" id="select-all" /></th>
            <th>Event</th>
            <th>Begin Date</th>
            <th>End Date</th>
        </tr>
        </thead>
        <tbody>
        @foreach (var eventModel in Model.Events)
        {
            <tr>
                <td><input name="select" class="event-checkbox" type="checkbox" value="@eventModel.EventId" /></td>
                <td><a title="Go to @eventModel.Title" href="@eventModel.Url.AbsoluteUri">@eventModel.Title</a></td>
                <td>@eventModel.BeginDate.ToShortDateString()</td>
                <td>@eventModel.EndDate.ToShortDateString()</td>
            </tr>
        }
        </tbody>
    </table>
}
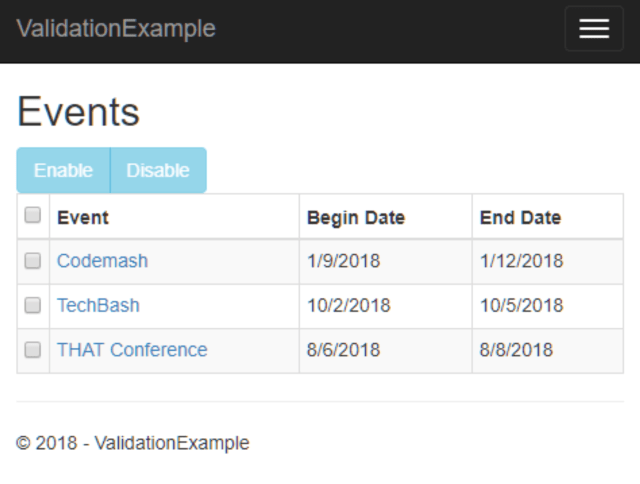
This grid has checkboxes down the left side with batch buttons to enable and disable events. Clicking on the checkbox in the header will select all of them.
First, we need our elements affected by the user's actions.
this.enabledButton = document.getElementById("enabled-button");
this.disabledButton = document.getElementById("disabled-button");
Next, we need our validations. These validations are stored in an array with the following items:
- The element to be enabled/disabled
- A simple condition
- A lambda when the condition is true
- and also a lambda when the condition is false
Our validations array looks like this:
 // Custom validations for enabling/disabling DOM elements based on conditions.
    this.validations = [
    {
 // When should the enable button be active?
 element: this.enabledButton,
        condition: () => {
 var checkedCheckboxes = areChecked();
            var valid = (
 // Do we have even one checkbox selected?
 checkedCheckboxes.length > 0
            );
            return valid;
        },
        trueAction: (elem) => {
            elem.removeAttribute("disabled");
            elem.classList.remove("disabled");
        },
        falseAction: (elem) => {
            elem.setAttribute("disabled", "disabled");
            elem.classList.add("disabled");
        }
    },
 // Second validation
 {
 // When should the disable button be active?
 element: this.disabledButton,
 condition: () => {
 var checkedCheckboxes = areChecked();
            var valid = (
 // No checkboxes are available, time to disable.
 checkedCheckboxes.length > 0
 );
            return valid;
        },
        trueAction: (elem) => {
            elem.removeAttribute("disabled");
            elem.classList.remove("disabled");
        },
        falseAction: (elem) => {
            elem.setAttribute("disabled", "disabled");
            elem.classList.add("disabled");
        }
    }
];
We are basically setting up a "coding array." This array has everything we need to write data-driven code.
If you notice the trueAction and falseAction, we are setting up the lambda to receive an element. Once we receive the element, we apply certain attributes to the DOM element when it's either true or a false action.
Our condition can be as complex as we need it to be to enable or disable certain DOM elements.
Enabling/Disabling the Elements
To make our DOM elements enabled or disabled, we need to loop through our validations and act on them so we'll use the map function.
function updateValidations() {
    Array.from(validations).map( (item, index, array) => {
        if (item.condition()) {
            item.trueAction(item.element);
        } else {
            item.falseAction(item.element);
        }
    });
}
Once we have our function to enable or disable the DOM elements, we need to attach our events for the checkboxes.
// Set the "select all" checkbox.
var checkAll = document.getElementById("select-all");
checkAll.addEventListener("change", checkAllCheckbox);
Our change event checkAllCheckbox will, of course, call our updateValidations();
function checkAllCheckbox() {
    var allCheckbox = document.getElementById("select-all");
    var eventCheckboxes = Array.from(
        document.getElementsByClassName("event-checkbox")
    );
    eventCheckboxes.map( (elem, index, array) => {
        elem.checked = allCheckbox.checked;
    });

    updateValidations();
}
All without using jQuery or the validations library.
A Browser Snag
Of course, there is always a snag with...uh...certain browsers.
Some users reported issues with the checkbox click not working along with other checkboxes acting up.
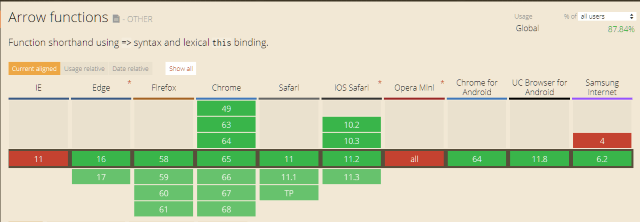
I wondered about the arrow (=>) syntax for older browsers.
So I went to caniuse.com to confirm this would work with other browsers.
Wouldn't you know it? I went to the arrow syntax and found this:
https://caniuse.com/#search=arrow

Since we can't use the arrow syntax, the fix is rather simple.
Instead of doing this,
{
    // When should the enable button be active?
    element: this.enabledButton,
    condition: () => {
        var checkedCheckboxes = areChecked();
        var valid = (
 // Do we have even one checkbox selected?
 checkedCheckboxes.length > 0
        );
        return valid;
    },
    trueAction: (elem) => {
        elem.removeAttribute("disabled");
        elem.classList.remove("disabled");
    },
    falseAction: (elem) => {
        elem.setAttribute("disabled", "disabled");
        elem.classList.add("disabled");
    }
},
we can do this (changes in bold):
{
 // When should the enable button be active?
 element: this.enabledButton,
    condition: function () {
        var checkedCheckboxes = areChecked();
        var valid = (
         // Do we have even one checkbox selected?
 checkedCheckboxes.length > 0
        );
        return valid;
    },
    trueAction: function (elem) {
        elem.removeAttribute("disabled");
        elem.classList.remove("disabled");
    },
    falseAction: function (elem) {
        elem.setAttribute("disabled", "disabled");
        elem.classList.add("disabled");
    }
},
Remember, lambda's are merely anonymous delegates. Replacing the arrow syntax with a simple function works wonders for backward-compatibility.
For the project source, check out my GitHub repository.
Conclusion
Once this was setup, I was able to use this across a number of pages to "lead" the user to what they can and can't do on the screen. When one DOM element was enabled, it trigger's two other elements for the user to interact with on the screen.
This can be easily modified to work with submit buttons as well. If all of these conditions are met, enable the submit button. If not, disable it until all conditions are met.
Again, you can make this as complex or simple as you want.
Do you still use the jQuery validations library? Did you replace it? What did you replace it with? Post your comments below and let's discuss!


