Building a Menu System in ASP.NET MVC
As you build your web application, a modular menu system is always good to have for future projects. Today, I show you a data-driven menu system that's easily configurable and future-proof for various projects.

UPDATE: I've updated the menu system to work with ASP.NET Core 3.1 with MVC and EF Migrations.
Updating the Menu System to ASP.NET Core 3.1 with Microsoft Identity
One of the primary components of web applications is a menu or navigation system that is extremely simple, easy to use, and versatile as opposed to the standard HTML way of building navigational elements.
Wouldn't it be better to add a new menu item through a table in a database and have it automatically appear in your menu?
I recently came up with an easy way to create a menu system that is fast, flexible, and modular.
Once you have a menu component in place, you can include this in your general library toolkit, making your applications future-proof.
We'll address some of these features in this post.
Requirements
Here are some features that I feel are required in a menu system:
- Active menu item
- Hierarchical/nesting
- Icons
While these features are pretty standard, some users may wrestle with implementing each feature.
So let's start with storing the data.
What's the Schema?
This schema will be extremely boring.
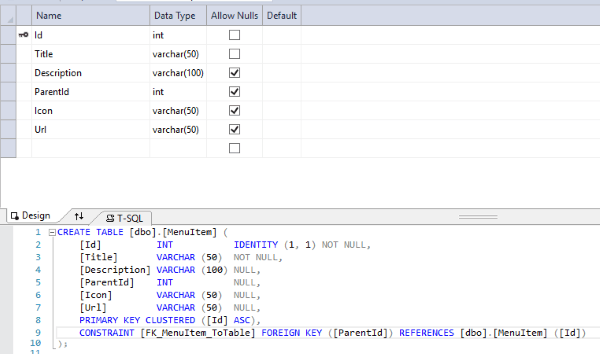
For our menu items, we'll create a single table that looks like the following:

ParentId will be the foreign key pointing back to the Id. This will address the hierarchical nesting of our menu system.
One example for a hierarchical menu would be a "Setup" menu item with a number of other menu items under the parent of "Setup."
| Id | Title | ParentId | Icon | Url |
|---|---|---|---|---|
| 1 | Setup | null | wrench | null |
| 2 | Users | 1 | user | /Setup/Users |
| 3 | Security | 1 | lock | /Setup/Security |
| 4 | Menu Management | 1 | menu | /Setup/Menu |
As you can see, Setup is the parent and has an Id of 1. All of the other menu items point to the Setup record by the ParentId. This allows us our hierarchical menu. Any depth...any amount.
If every ParentId is null, then it could be a simple one-level horizontal or vertical menu.
Entity Framework
Now that we have our table structure, we can use Entity Framework to create the loading of our menu.
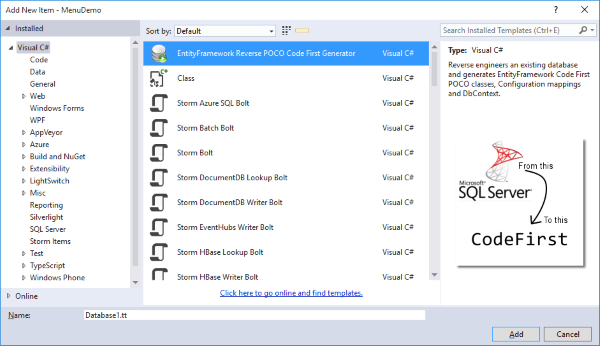
We need to create our code-first models. We use the "Entity Framework Reverse POCO Code First Generator" located here.

If you want to know how to use it, check the Ludicrous Series on using an ORM for creating a quick and easy models from a database.
Once you have your MenuItem model and your Context, you can create a MenuRepository.
public interface IRepository<TEntity> where TEntity : class
{
    IQueryable<TEntity> GetAll();
    IQueryable<TEntity> Find(Expression<Func<TEntity, bool>> predicate);
    int Count(Expression<Func<TEntity, bool>> predicate);
    int Add(TEntity entity);
    int SaveChanges();
    int Delete(TEntity entity);
    TEntity First(Expression<Func<TEntity, bool>> predicate);
    void Dispose();
}
public class MenuRepository : Repository<MenuItem>
{
    public MenuRepository(DbContext objectContext)
        : base(objectContext)
    {
    }
    public MenuRepository() : this(new MenuContext())
    {
    }
}
public class Repository<TEntity> : IRepository<TEntity> where TEntity : class
{
    protected DbContext DbContext;
    public Repository(DbContext context)
    {
        DbContext = context;
    }
    public virtual IQueryable<TEntity> GetAll()
    {
        return DbContext.Set<TEntity>();
    }
    public virtual IQueryable<TEntity> Find(Expression<Func<TEntity, bool>> predicate)
    {
        return DbContext.Set<TEntity>().AsNoTracking().Where(predicate);
    }
    public virtual int Count(Expression<Func<TEntity, bool>> predicate)
    {
        return DbContext.Set<TEntity>().Count(predicate);
    }
    public int Add(TEntity entity)
    {
        if (entity == null)
            throw new ArgumentNullException("entity");
        DbContext.Set<TEntity>().Add(entity);
        return DbContext.SaveChanges();
    }
    public int SaveChanges()
    {
        return DbContext.SaveChanges();
    }
    public int Delete(TEntity entity)
    {
        if (entity == null)
            throw new ArgumentNullException("Entity Issue. It''s null.");
        DbContext.Entry(entity).State = EntityState.Deleted;
        return DbContext.SaveChanges();
    }
    public TEntity First(Expression<Func<TEntity, bool>> predicate)
    {
        return DbContext.Set<TEntity>().FirstOrDefault(predicate);
    }
    protected virtual T ExecuteReader<T>(Func<DbDataReader, T> mapEntities,
        string exec, params object[] parameters)
    {
        using (var conn = new SqlConnection(DbContext.Database.Connection.ConnectionString))
        {
            using (var command = new SqlCommand(exec, conn))
            {
                conn.Open();
                command.Parameters.AddRange(parameters);
                command.CommandType = CommandType.StoredProcedure;
                try
                {
                    using (var reader = command.ExecuteReader())
                    {
                        T data = mapEntities(reader);
                        return data;
                    }
                }
                finally
                {
                    conn.Close();
                }
            }
        }
    }
    public void Dispose()
    {
        Dispose(true);
        GC.SuppressFinalize(this);
    }
    protected virtual void Dispose(bool disposing)
    {
        if (!disposing) return;
        if (DbContext == null) return;
        DbContext.Dispose();
        DbContext = null;
    }
}
Once we have the repository available, we need our ViewModels defined.
public class BaseViewModel
{
    public List<MenuItem> MenuItems { get; set; }
    public string Title { get; set; }
}
public class HomeViewModel : BaseViewModel
{
    // Place any more Home properties here.
}
Perfect!
If you are wondering what I'm doing here with the ViewModels, check out the post on how to make a BaseViewModel for your Layouts.
Now that we have our ViewModels, we can modify our Controller to load everything.
public class HomeController : Controller
{
    private readonly MenuRepository _repository = new MenuRepository();
    public ActionResult Index()
    {
        var viewModel = new HomeViewModel
        {
            MenuItems = _repository.GetAll().ToList(),
            Title = "Menu Demo"
        };
        return View(viewModel);
    }
}
The loading of these records and sending them over to the View is the easy part. The muscle is in the HtmlHelpers that we'll build.
The records on the server-side is done. Let's turn our attention to the client-side of things.
I Need Help(ers)!
The nice thing about receiving a list of menu items is that now you can repurpose the menu any way you want using Html Helpers.
Right now, we'll build will be a simple horizontal menu.
For the icons, we are using FontAwesome. You can install the package through the Package Manager Console by typing:
install-package fontawesome
This Helper will just list out the menu items with a UL and the menu items in the LI. Pretty simple.
public static class MenuHelpers
{
    #region Horizontal Menu
    public static HtmlString HorizontalMenu(this HtmlHelper helper,
        IEnumerable<MenuItem> items)
    {
        if (items == null || !items.Any())
        {
            return new HtmlString(String.Empty);
        }
        var ul = new TagBuilder("ul");
        ul.AddCssClass("list-inline list-unstyled");
        var sb = new StringBuilder();
        items.ForEach(e=> CreateMenuItem(e, sb));
        ul.InnerHtml = sb.ToString();
        return new HtmlString(ul.ToString(TagRenderMode.Normal));
    }
    #endregion
    private static void CreateMenuItem(MenuItem menuItem, StringBuilder sb)
    {
        if (String.IsNullOrEmpty(menuItem.Url))
        {
            var li = new TagBuilder("li")
            {
                InnerHtml = String.Format("<i class=\"fa fa-{0}\"></i> {1}",
                    menuItem.Icon, menuItem.Title)
            };
            sb.Append(li.ToString(TagRenderMode.Normal));
        }
        else
        {
            var li = new TagBuilder("li")
            {
                InnerHtml =
                    String.Format("<a href=\"{0}\" title=\"{1}\"><i class=\"fa fa-{2}\"></i> {3}</a>",
                    menuItem.Url, menuItem.Description, menuItem.Icon, menuItem.Title)
            };
            sb.Append(li.ToString(TagRenderMode.Normal));
        }
    }
}
Now the awesome part. Your View passes the menu items in the model over to the HorizontalMenu and returns a finished navigation menu. To use your new menu, use this syntax:
@Html.HorizontalMenu(Model.MenuItems)
Let's try a toolbar menu now.
Check the Tool Shed
Did you know that you can also create a toolbar very easily with this menu system?
You have the icons, let's make them look like buttons.
<style>
    .toolbar { padding: 0; outline: 1px solid #CCC; background-color: #DDD }
</style>
@Html.Toolbar(Model.MenuItems)
As you can see, the View is pretty simple.
Again, the muscle is in the HtmlHelper. Let's create the toolbar helper.
public static HtmlString Toolbar(this HtmlHelper helper,
    IEnumerable<MenuItem> items)
{
    if (items == null || !items.Any())
    {
        return new HtmlString(String.Empty);
    }
    var ul = new TagBuilder("ul");
    ul.AddCssClass("list-inline list-unstyled toolbar");
    var sb = new StringBuilder();
    items.ForEach(e => CreateToolbarItem(e, sb));
    ul.InnerHtml = sb.ToString();
    return new HtmlString(ul.ToString(TagRenderMode.Normal));
}
private static void CreateToolbarItem(MenuItem menuItem, StringBuilder sb)
{
    if (String.IsNullOrEmpty(menuItem.Url))
    {
        var li = new TagBuilder("li")
        {
            InnerHtml = String.Format("<i title=\"{0}\" class=\"fa fa-{1}\"></i>",
                menuItem.Description, menuItem.Icon)
        };
        sb.Append(li.ToString(TagRenderMode.Normal));
    }
    else
    {
        var li = new TagBuilder("li")
        {
            InnerHtml =
                String.Format("<a class=\"btn btn-default btn-sm\" href=\"{0}\" "+
                    "title=\"{1}\"><i class=\"fa fa-{2}\"></i></a>",
                menuItem.Url, menuItem.Description, menuItem.Icon)
        };
        sb.Append(li.ToString(TagRenderMode.Normal));
    }
}
If we don't have a url, I default it to just display a button. We just don't have an anchor tag to wrap around it.
Think of it as disabled. Since the rest of the buttons have Urls, they look like actual buttons.
We're Going Vertical
Just to complete this exercise we'll create a vertical menu.
#region Vertical Menu
public static HtmlString VerticalMenu(this HtmlHelper helper,
    IEnumerable<MenuItem> items)
{
    if (items == null || !items.Any())
    {
        return new HtmlString(String.Empty);
    }
    var ul = new TagBuilder("ul");
    ul.AddCssClass("list-unstyled");
    var sb = new StringBuilder();
    items.ForEach(e => CreateMenuItem(e, sb));
    ul.InnerHtml = sb.ToString();
    return new HtmlString(ul.ToString(TagRenderMode.Normal));
}
#endregion
All we do is modify the CSS by removing the list-inline class and keep our list-unstyled class and reuse the CreateMenuItem code from above.
Conclusion
Today, we discussed how to create a menu system that can easily be adapted to any type of project.
The heavy lifting is done by the HtmlHelpers and if you expand on this demo, there is no end to the type of navigation menus you could create. You could build simple accordion, hierarchical, and panel menus as well as include permissions to make certain menu items available to certain users.
This is just a jump-start to show you how powerful and versatile HtmlHelpers can be when used across your projects.
Is there a menu type that you want to see built? Post your comments below and I'll see if I can build it quick.


