PowerShell SQL Deployment – Part 2: Azure DevOps
In this second and final part, our guest blogger, Andrew Hinkle, provides a walkthrough of how to deploy databases to Azure using Powershell.

DogFoodCon 2019 is October 3rd – 4th. Ben Miller will be presenting [DevOps] DBAs working Smarter not Harder with PowerShell and [SQL/BI] Inside the DBAtools PowerShell Module.
This article is a follow-up to Part 1 where you learned how to create a couple PowerShell scripts to call the Invoke-Sqlcmd to apply SQL files to a SQL Server instance's database. That's nice, but to get the greatest reward of this feature we're going to implement the PowerShell script within your Azure DevOps Build/Release pipeline. Once you learn how to setup these Build and Release definitions in the prototype you'll be one step closer to a push button deployment and eventually an automated Continuous Deployment process. This is an advanced topic for those not familiar with the Azure DevOps Build/Release pipeline.
Assumptions
- Source Control
- TFVC (Team Foundation Version Control) is demoed in this article
- If you use GitHub or another source control source allowed in the pipeline adjust the steps to meet your needs
- SQL Server instance is setup with a database
- Azure databases follow most of the same steps and while I noted those few differences this article focuses on an on premises SQL Server database like Part 1
- Azure DevOps Build Pipelines has been setup
- Azure Agent Pools has been setup
- You know which agents are in the Agent Pools and most importantly which service accounts are running the agents
- Check out the Service Accounts Security Discussion below for critical information regarding security
- Basic understanding of the Azure DevOps Build/Release pipeline
- Know how to create a Build and Release definition
Check-in PowerShell Scripts into Source Control (TFVC)
In your source control under the equivalent of a Sandbox folder create the following folder structure. These are the same files we created in Part 1. This folder structure is simple for this prototype. You'll need to work with your team on where the scripts folder should be stored since they won't change much if ever. For the sql folder you may want to standardize on a release folder with a folder for each release number containing the sql files (sql\R19.12\DATABASE1\*). When you have variables changing between releases you add queue time variables and reference them in the build definition so the build definition doesn't have to change.
- Create folder structure in source control
- DevOps\src\scripts\COMPANYNAME.DevOps.Sql.psm1
- DevOps\src\scripts\DeploySql.ps1
- DevOps\src\sql\DATABASE1\00.Setup.sql
- DevOps\src\sql\DATABASE1\01.Deploy.sql
- DevOps\src\sql\DATABASE1\99.TearDown.sql
- DevOps\src\sql\DATABASE2\00.Setup.sql
- DevOps\src\sql\DATABASE2\01.Deploy.sql
- DevOps\src\sql\DATABASE2\99.TearDown.sql
- Check-in code
Create the Build Definition
We'll create an Azure DevOps Build Definition that will get the PowerShell scripts and SQL files from source control, copy them to a folder, and then publish them so the files are available for the Release Definition to deploy them by environment. Eventually when you are comfortable with the process you can setup the Build Definition to automatically create when code is checked into the source control location satisfying Continuous Integration. For now we'll do it manually. Create a Build Definition following the template below.
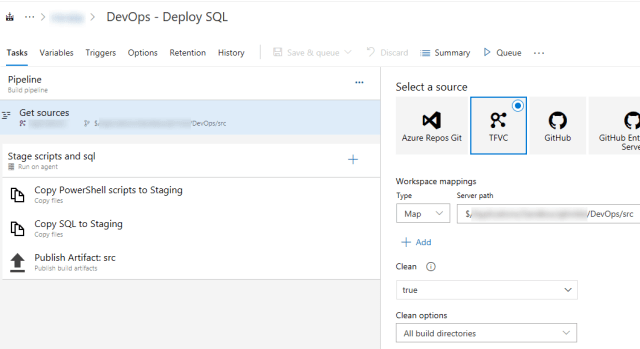
Title: DevOps - Deploy SQL
Tasks
- Pipeline
- Get sources
- Select your source: TFVC (Team Foundation Version Control)
- Workspace mappings
- Type: Map
- Server path: {select the path where you checked in the "src" folder}
- Clean: true
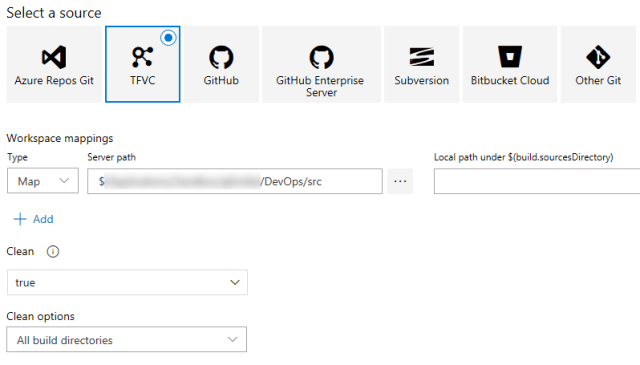
- Get sources
- Stage scripts and sql (Run on agent)
- Display name: Stage scripts and sql
- Agent pool: {name of agent pool}
- See the Service Accounts Security Discussion below
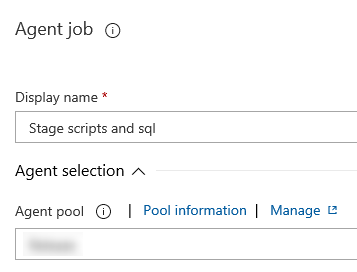
- See the Service Accounts Security Discussion below
- Copy PowerShell scripts to Staging
- Source Folder: $(Build.SourcesDirectory)
- Contents: scripts\**
- Target Folder: $(Build.ArtifactStagingDirectory)
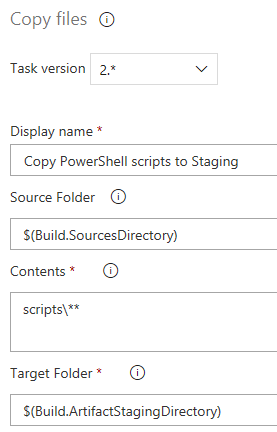
- Copy SQL to Staging
- Source Folder: $(Build.SourcesDirectory)
- Contents: sql\**
- Target Folder: $(Build.ArtifactStagingDirectory)
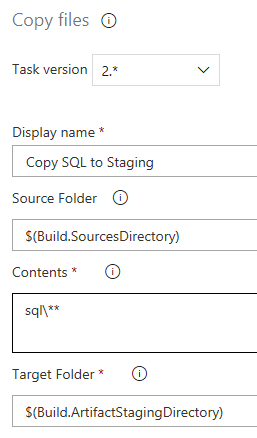
- Publish Artifact: src
- Path to publish: $(Build.ArtifactStagingDirectory)
- Artifact name: src
- Artifact publish location: Azure Pipelines
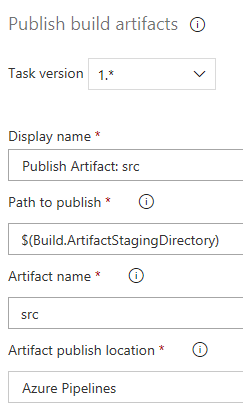
Create the Release Definition
We'll create an Azure DevOps Release Definition that picks up the staged artifacts which are the PowerShell scripts and SQL files and deploy them to the DEV environments. In this scenario the SQL Server instance for Database1 and Database 2 are on different DEV servers. We'll need to use variables scoped to each environment. Also, let's deploy the databases in order and stop the deployment if the first SQL files fail to deploy. Once the definition is setup and you are confident in the process you could automate the creation of the Release Definition whenever the associated Build finishes satisfying a Continuous Deployment strategy. For now we'll leave the process manual. Create a Release Definition following the template below.
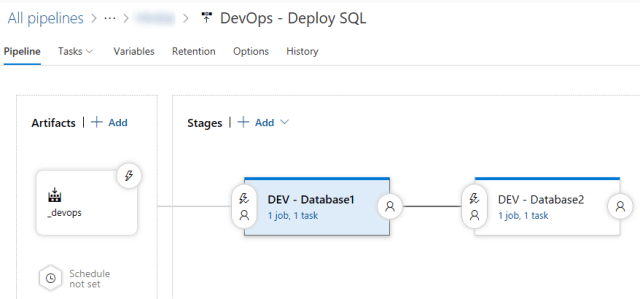
Title: DevOps - Deploy SQL
Pipeline
- Artifacts
- Project: {Select the same Project the Build Definition was created under}
- Source: {Select the Build Definition you created}
- Default Version: Latest
- Source Alias: _devops
- Changing the Alias allows you to clone the Release Definition for feature environments without having an Alias that was named as the original definition
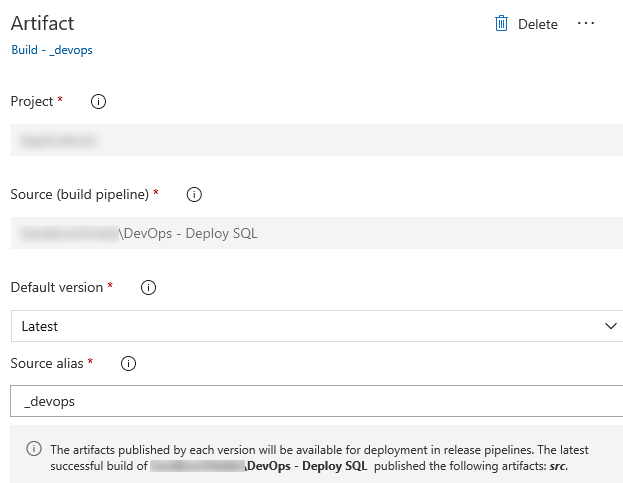
- Changing the Alias allows you to clone the Release Definition for feature environments without having an Alias that was named as the original definition
- Tasks - DEV - Database1
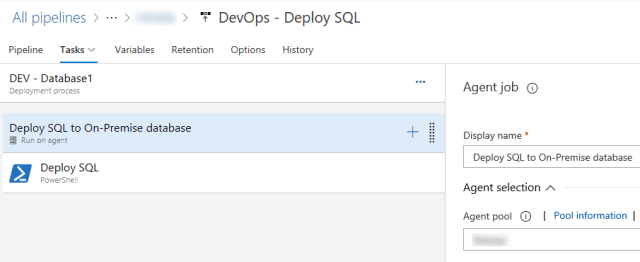
- Agent job
- Display name: Deploy SQL to On-Premise database
- Agent pool: {name of agent pool}
- See the Service Accounts Security Discussion below
- Artifact download: _devops
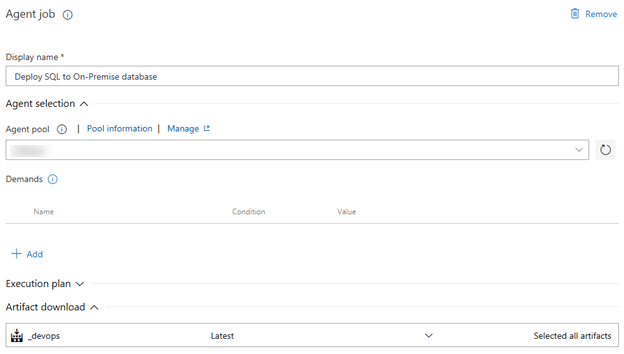
- PowerShell
If you are deploying to an Azure database then choose Azure PowerShell, the Invoke-SqlCmd works the same but it's using the Azure PowerShell modules. You still need to have the Service Account and permissions setup. You shouldn't need to worry about firewall settings when run through the Release Definition.- Display name: Deploy SQL
- Type: File Path
- Script Path:
$(System.DefaultWorkingDirectory)/_devops/src/scripts/DeploySql.ps1
- Arguments:
-DevOpsSqlModule $(DevOpsSqlModule) -ServerInstance $(ServerInstance) -Database $(Database) -SqlFolder $(SqlFolder)- The $(*) are environment variables setup in the Variables tab that you'll setup shortly
- ErrorActionPreference: Stop
- Do not continue if the PowerShell exits with an error
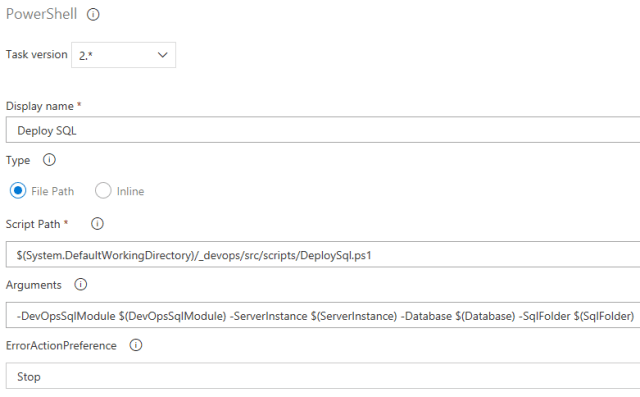
- Do not continue if the PowerShell exits with an error
- Tasks - DEV - Database2
- Repeat the steps for "Tasks - DEV - Database1" updating the title of the task
- Variables (Pipeline Variables)
The scope specifies which task a variable is applied to. Release means all tasks. The module is the same for both tasks so we set the scope to Release while the rest of the variables are scoped to the environment.- Database
- Value: {Database1}
- Scope: DEV - Database1
- Database
- Value: {Database2}
- Scope: DEV - Database2
- DevOpsSqlModule
- Value: "$(System.DefaultWorkingDirectory)/_devops/src/scripts/COMPANYNAME.DevOps.Sql.psm1"
- Scope: Release
- ServerInstance
- Value: {ServerInstance1}
- Scope: DEV - Database1
- ServerInstance
- Value: {ServerInstance2}
- Scope: DEV - Database2
- SqlFolder
- Value: "$(System.DefaultWorkingDirectory)/_devops/src/sql/DATABASE1/"
- Scope: DEV - Database1
- SqlFolder
- Value: "$(System.DefaultWorkingDirectory)/_devops/src/sql/DATABASE2/"
- Scope: DEV - Database2

- Database
- Save and Queue
- Agent job
Error Results
From the Part 1 article remember that we caught exceptions thrown when trying to apply a SQL file. We built the error message using the special Azure DevOps codes and returned the stack trace. By exiting with code "1" from the PowerShell script the task was triggered as an error and stopped processing. In this case we did not have enough permissions to create the test stored procedure.

Success Results
When the pipeline finally worked it felt good to see all of those successful check marks!
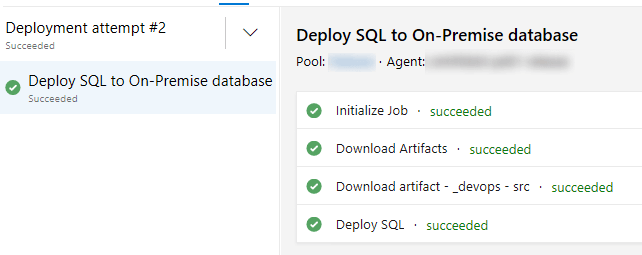
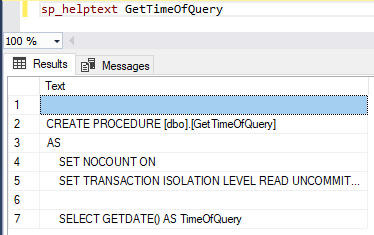
DON'T ASSUME IT WORKED!!! Just because the release succeeded double-check by running the "sp_helptext GetTimeOfQuery", that's the name of the stored procedure we created in the Part 1 article. Cool, all looks good.
Service Accounts Security Discussion
Critically important! The (OnPrem or Azure) Active Directory user account associated with the agents running in the Agent pool must have permission to apply the SQL scripts. These PowerShell scripts are setup with the assumption that you are using Integrated Security to deploy the SQL files. This saves you a ton of effort with encryption by abstracting it out to the Active Directory. Usually it's easier to start with giving the account db_owner permissions on the database you're deploying to just to prove out the concept.
Work with your DBAs and Ops to create Service Accounts that are strictly used to deploy the SQL files. Limit the service accounts by environment (DEV/QA/PROD as an example). DBAs should restrict the permissions of the service accounts to just what is necessary for the deployments.
The Invoke-Sqlcmd allows for other methods such as connection strings with the user account and password, but I prefer Integrated Security to avoid leaking passwords and other secrets. Research and understand the security risks with the scripts and how they connect.
Conclusion
I have demonstrated how to create the Azure DevOps Build/Release pipeline implementing PowerShell to deploy SQL to an OnPrem database and noted the differences for deploying to an Azure database. Next steps include implementing this process in a Sandbox to learn the process yourself. Work with the DBAs and Ops to create Service Accounts to tighten permissions and security.
To learn more about how to create your SQL files automatically by shredding the results published from a DACPAC created from a Database Project attend: DogFoodCon 2019 is October 3rd – 4th. Ben Miller will be presenting [DevOps] DBAs working Smarter not Harder with PowerShell and [SQL/BI] Inside the DBAtools PowerShell Module .
Did you know how to create a Build/Release pipeline to deploy SQL? Do you prefer "Deploying Databases using Azure DevOps Pipelines" following the steps outlined by Jonathan Danylko? Sure is nice to have options! If you weren't familiar with the DevOps pipeline before are you interested in learning more now? Post your comments below and let's discuss!


